<?xml version="1.0" encoding="utf-8"?><feed xmlns="http://www.w3.org/2005/Atom" xml:lang="en"><generator uri="https://jekyllrb.com/" version="4.3.4">Jekyll</generator><link href="https://www.geckox.mx/feed.xml" rel="self" type="application/atom+xml" /><link href="https://www.geckox.mx/" rel="alternate" type="text/html" hreflang="en" /><updated>2025-10-27T00:55:50+00:00</updated><id>https://www.geckox.mx/feed.xml</id><title type="html">geckox</title><subtitle>Exposición a productos y empresas nacionales, temás de tecnología relevantes para los autores y probablemente sus interéses.</subtitle><author><name>juankman94</name></author><entry xml:lang="es-MX"><title type="html">¿Cómo instalar OpenBSD?</title><link href="https://www.geckox.mx/2025/02/22/como-instalar-openbsd.html" rel="alternate" type="text/html" title="¿Cómo instalar OpenBSD?" /><published>2025-02-22T20:50:00+00:00</published><updated>2025-02-22T20:50:00+00:00</updated><id>https://www.geckox.mx/2025/02/22/como-instalar-openbsd</id><content type="html" xml:base="https://www.geckox.mx/2025/02/22/como-instalar-openbsd.html"><![CDATA[<p>Hace unos años experimenté con OpenBSD con la intención de probarlo como
estación de trabajo guiándome con <a href="https://openbsdjumpstart.org/">openbsdjumpstart.org</a>. Si bien no era la
herramienta adecuada para mi día a día, me interesó su forma de manejo y
quiero darle una segunda oportunidad como laboratorio de casa.</p>

<h2 id="obteniendo-los-archivos-de-instalación">Obteniendo los Archivos de Instalación</h2>

<p>Cuando hice todo esto faltaban unas cuantas semanas para el lanzamiento de la
versión 7.6 por lo que opté por descargar la versión <code class="language-plaintext highlighter-rouge">snapshot</code> y, de paso,
forzarme a probar el proceso de upgrade de OpenBSD, que supuestamente asemeja
al modo <em>rolling release</em>, i.e., no es necesario reinstalar el SO para un
upgrade mayor.</p>

<p>Mi aparato es de arquitectura <code class="language-plaintext highlighter-rouge">amd64</code> y usé <code class="language-plaintext highlighter-rouge">wget(1)</code> para descargar todos
los archivos necesarios con los siguientes comandos:</p>

<div class="augmented-highlight" augmented-ui="tl-clip t-clip-x tr-clip r-clip-y br-clip b-clip-x bl-clip l-clip-y exe">
<figure class="highlight"><pre><code class="language-shell" data-lang="shell"><span class="nv">$ </span><span class="nb">mkdir</span> ~/Downloads/openbsd
<span class="nv">$ </span><span class="nb">cd</span> ~/Downloads/openbsd
<span class="nv">$ </span>wget <span class="nt">-r</span> <span class="nt">--no-parent</span> <span class="nt">--no-clobber</span> <span class="s2">"https://cdn.openbsd.org/pub/OpenBSD/snapshots/amd64/"</span>
<span class="nv">$ </span><span class="nb">mv </span>cdn.openbsd.org/pub/OpenBSD/snapshots/amd64 snapshot-amd64
<span class="nv">$ </span><span class="nb">rm</span> <span class="nt">-r</span> cdn.openbsd.org
<span class="nv">$ </span><span class="nb">cd </span>snapshot-amd64
<span class="nv">$ </span>shasum <span class="nt">-c</span> SHA256</code></pre></figure></div>

<h2 id="preparando-dispositivos-de-instalación">Preparando Dispositivos de Instalación</h2>

<figure class="right my-1">
  <img src="/assets/images/openbsd-7_6.jpg" alt="Pieza de arte de OpenBSD 7.6" loading="lazy" />

  <figcaption>OpenBSD 7.6 fue lanzado el 8 de Octubre del 2024</figcaption>

</figure>

<p>Yo usé 2 USB para mi instalación, por lo que mis dispositivos eran los
siguientes:</p>

<ol>
  <li>USB (“sdb”), <code class="language-plaintext highlighter-rouge">ext2</code>, paquetes de software</li>
  <li>USB (“sdc”), imagen de disco booteable (<code class="language-plaintext highlighter-rouge">install76.img</code>)</li>
  <li>SSD, disco en el que instalaré el SO</li>
</ol>

<p>Noté que al usar el formato FAT para la USB con los paquetes de software
ocasiona un error al momento de verificar la integridad.
Específicamente, el programa de instalación no reconoce los archivos
<code class="language-plaintext highlighter-rouge">INSTALL.amd64</code> ni <code class="language-plaintext highlighter-rouge">SHA256.sig</code>.</p>

<p><strong>NOTA</strong>: OpenBSD tiene soporte nativo para <code class="language-plaintext highlighter-rouge">ext2</code> pero tengo entendido que
no tiene soporte para <code class="language-plaintext highlighter-rouge">ext3</code> ni <code class="language-plaintext highlighter-rouge">ext4</code>.</p>

<p>Desde un sistema Linux:</p>

<div class="augmented-highlight" augmented-ui="tl-clip t-clip-x tr-clip r-clip-y br-clip b-clip-x bl-clip l-clip-y exe">
<figure class="highlight"><pre><code class="language-shell" data-lang="shell">% fdisk /dev/sdb
<span class="c"># crea una particion en la USB, e.g., sdb1</span>
% mkfs.ext2 /dev/sdb1
% mount /dev/sdb1 /mnt/usb
% <span class="nb">mkdir</span> <span class="nt">-p</span> /mnt/usb/7.6/amd64
% <span class="nb">cp</span> <span class="nt">-r</span> ~/Downloads/openbsd/snapshot-amd64/<span class="k">*</span> /mnt/usb/7.6/amd64/
% umount /dev/sdb1
% <span class="nb">dd </span><span class="k">if</span><span class="o">=</span>~/Downloads/openbsd/snapshot-amd64/install76.img <span class="nv">of</span><span class="o">=</span>/dev/sdc <span class="nv">bs</span><span class="o">=</span>1m</code></pre></figure></div>

<p><strong>NOTA</strong>: al momento que descargué los archivos, la ultima versión estable
era 7.5, por lo que la versión <code class="language-plaintext highlighter-rouge">snapshot</code> se referencía como <code class="language-plaintext highlighter-rouge">7.6</code>.</p>

<h2 id="proceso-de-instalación">Proceso de Instalación</h2>

<p>Aun no tengo un modelo mental claro de como el sistema operativo mapea los
discos a archivos, pero logré instalar el sistema creando archivos especiales
con el script <code class="language-plaintext highlighter-rouge">MAKEDEV(8)</code>.</p>

<p>Primero listé los discos encontrados por el kernel y después llamé al script
para crear los archivos especiales:</p>

<div class="augmented-highlight" augmented-ui="tl-clip t-clip-x tr-clip r-clip-y br-clip b-clip-x bl-clip l-clip-y exe">
<figure class="highlight"><pre><code class="language-shell" data-lang="shell">% sysctl hw.disknames
hw.disknames<span class="o">=</span>sd0:,sd1:f0bda3e4b66f6f9c,sd2:
% <span class="nb">cd</span> /dev
% <span class="k">for </span>my_dev <span class="k">in </span>sd0 sd1 sd2 <span class="p">;</span> <span class="k">do </span>sh MAKEDEV <span class="nv">$my_dev</span> <span class="p">;</span> <span class="k">done</span> <span class="p">;</span> <span class="nb">cd</span> /
% <span class="k">for </span>my_dev <span class="k">in </span>sd0 sd1 sd2 <span class="p">;</span> <span class="k">do </span>fdisk <span class="nv">$my_dev</span> <span class="p">;</span> <span class="k">done</span>
<span class="c"># [...] contenido de tablas de partición de los 3 discos</span></code></pre></figure></div>

<p>Con los discos en su lugar, procedí con la instalación automática que ofrece
el instalador. No recuerdo como se llama el script, pero ejecutando <code class="language-plaintext highlighter-rouge">ls /</code>
deberá ser aparente la ubicación.</p>

<h3 id="problemas-encontrados">Problemas Encontrados</h3>

<h4 id="firmware">Firmware</h4>

<p>Al finalizar la instalación y bootear el sistema por primera vez me encontré
con un sistema roto: el proceso de arranque abortaba por no encontrar el
firmware (DRM) para mi GPU de AMD. El error decía, entre otras
cosas: “openbsd amdgpu_discovery_init failed”</p>

<p>Para solucionar este problema tuve que repetir el proceso de instalación pero
esta vez configurando una interfaz de red durante el proceso y que así el
firmware pudiera ser instalado automaticámente gracias al comando
<code class="language-plaintext highlighter-rouge">fw_update(8)</code>.</p>

<h4 id="reloj">Reloj</h4>

<p>Apenas pude bootear a la nueva instalación, tuve problemas al buscar paquetes
con <code class="language-plaintext highlighter-rouge">pkg_info -Q</code> pues por algún motivo no se configuró correctamente la hora
de mi sistema. Esto se corrigió fácilmente con los siguientes comandos:</p>

<div class="augmented-highlight" augmented-ui="tl-clip t-clip-x tr-clip r-clip-y br-clip b-clip-x bl-clip l-clip-y exe">
<figure class="highlight"><pre><code class="language-sh" data-lang="sh">% rcctl stop ntpd
% /usr/sbin/rdate time.cloudflare.com</code></pre></figure></div>

<p><strong>NOTA</strong>: como regla, prefiero configurar la hora de BIOS a UTC y dejar que los
sistemas operativos configuren la zona horaria.</p>

<h2 id="instalación-base">Instalación Base</h2>

<p>Una vez con el sistema funcionando, instalé <code class="language-plaintext highlighter-rouge">obsdfreqd</code> siguiendo los
<a href="https://dataswamp.org/~solene/2022-03-21-openbsd-cool-frequency.html">pasos indicados</a> por Solène. No funcionó a la primera, por lo que tuve que
modificar su configuración a través de <code class="language-plaintext highlighter-rouge">rc.conf.local(8)</code>:</p>

<div class="augmented-highlight" augmented-ui="tl-clip t-clip-x tr-clip r-clip-y br-clip b-clip-x bl-clip l-clip-y exe">
<figure class="highlight"><pre><code class="language-shell" data-lang="shell">% rcctl <span class="nb">enable </span>obsdfreqd
% <span class="nb">echo</span> <span class="s1">'obsdfreqd_flags="-T 45 -S hw.sensors.km0.temp0"'</span> <span class="o">&gt;&gt;</span> /etc/rc.conf.local</code></pre></figure></div>

<p>No hice mi tarea a fondo por lo que fuera del comando <code class="language-plaintext highlighter-rouge">rcctl(8)</code> no sabía como
funcionan los servicios en OpenBSD. Puesto que tiene un sistema init similar al
de Slackware, o sea, <code class="language-plaintext highlighter-rouge">/etc/rc.d/</code>, encontré el script de configuración
<code class="language-plaintext highlighter-rouge">/etc/rc.d/obsdfreqd</code> que inicialmente modifiqué para echarlo a andar, pero
abrí los scripts por curiosidad y me sorprendió la simplicidad de <code class="language-plaintext highlighter-rouge">rcctl(8)</code>.
Muy elegante y facil de seguir.</p>

<h2 id="access-point">Access Point</h2>

<p>Quería configurar mi equipo como Access Point siguiendo el <a href="https://www.openbsd.org/faq/pf/example1.html">ejemplo 1</a> de
<code class="language-plaintext highlighter-rouge">pf(4)</code> pero descubrí despues de varias horas que no es posible replicarlo
exactamente:</p>

<ul>
  <li>La antena de mi equipo usa el driver <a href="https://man.openbsd.org/iwm">iwm(4)</a>, diferente al driver <code class="language-plaintext highlighter-rouge">athn(4)</code>
del ejemplo</li>
  <li><code class="language-plaintext highlighter-rouge">iwm(4)</code> cuenta con los modos BSS y monitor, que le permiten asociarse con
un Access Point y recibir paquetes sin asociarse a un AP, respectivamente.</li>
  <li>No soporta el modo <code class="language-plaintext highlighter-rouge">Host AP</code> necesario para que funcione como Access Point</li>
</ul>

<h2 id="conclusión">Conclusión</h2>

<figure class="left mr-4">
  <img src="/assets/images/CoralFever.gif" alt="Pieza de arte de OpenBSD 6.7" loading="lazy" />

</figure>

<p>Me gustaría seguir escribiendo aquí a medida que vaya configurando mi sistema
pero esta publicación ya incluye mas de lo anticipado y ha perdido orden.</p>

<p>Estoy muy satisfecho con el script de instalación automática de OpenBSD,
es muy rapido y deja un margen de error pequeño comparandolo con el de
Slackware (no tengo experiencia con otros). El manejo del sistema base me
parece una chulada, es tan simple que mi instinto fue modificar los scripts
para arrancar los daemons que quería y a medio camino recapacité para no
seguir hackeando y mejor leer los manuales.</p>

<p>Y los manuales hasta ahora me parece que sostienen su reputación. Quise
habilitar un servicio con <code class="language-plaintext highlighter-rouge">rcctl</code> así que leí su manual, lo que me llevó
a <code class="language-plaintext highlighter-rouge">rc.conf(4)</code> y ahí mismo explican <code class="language-plaintext highlighter-rouge">rc.conf.local(4)</code>.</p>

<p>Por defecto usa <code class="language-plaintext highlighter-rouge">ksh</code> a la que no estoy acostumbrado pero para mi usuario
la cambié facilmente a <code class="language-plaintext highlighter-rouge">bash(1)</code> con <code class="language-plaintext highlighter-rouge">chsh(1)</code>.</p>]]></content><author><name>juankman94</name></author><category term="OpenBSD" /><category term="Homelab" /><summary type="html"><![CDATA[Decidí darle otro intento a OpenBSD y tomé notas de mi experiencia de instalación.]]></summary><media:thumbnail xmlns:media="http://search.yahoo.com/mrss/" url="https://www.geckox.mx/thumbnail-openbsd-7_6.jpg" /><media:content medium="image" url="https://www.geckox.mx/thumbnail-openbsd-7_6.jpg" xmlns:media="http://search.yahoo.com/mrss/" /></entry><entry xml:lang="es"><title type="html">Poema del 2024</title><link href="https://www.geckox.mx/2025/01/02/poema-del-2024.html" rel="alternate" type="text/html" title="Poema del 2024" /><published>2025-01-02T19:01:00+00:00</published><updated>2025-01-02T19:01:00+00:00</updated><id>https://www.geckox.mx/2025/01/02/poema-del-2024</id><content type="html" xml:base="https://www.geckox.mx/2025/01/02/poema-del-2024.html"><![CDATA[<article class="text-justify">
  <p>
    Subiendo y bajando en el<br />
    seno de tus días.
  </p>

  <p>
    Poco a poco el pulso baja<br />
    y el ritmo aumenta.
  </p>

  <p>
    Me arrepiento, perdono.<br />
    Quiero hacer mas y lamento el tiempo.
  </p>

  <p>
    Quiero ser un grano de arena<br />
    y no de plomo.
  </p>

  <p>
    Siento alivio. No hay diferencia.
  </p>
</article>]]></content><author><name>juankman94</name></author><category term="escritos" /><category term="español" /><category term="poema" /><summary type="html"><![CDATA[Me propuse escribir tres poemas en el 2024. Solo escribí uno.]]></summary><media:thumbnail xmlns:media="http://search.yahoo.com/mrss/" url="https://www.geckox.mx/monterrey_nublado.jpg" /><media:content medium="image" url="https://www.geckox.mx/monterrey_nublado.jpg" xmlns:media="http://search.yahoo.com/mrss/" /></entry><entry xml:lang="en"><title type="html">Using Sentry Cron Monitors in Ruby on Rails</title><link href="https://www.geckox.mx/2024/09/25/using-sentry-cron-monitors-in-ruby-on-rails.html" rel="alternate" type="text/html" title="Using Sentry Cron Monitors in Ruby on Rails" /><published>2024-09-25T18:30:00+00:00</published><updated>2024-09-25T18:30:00+00:00</updated><id>https://www.geckox.mx/2024/09/25/using-sentry-cron-monitors-in-ruby-on-rails</id><content type="html" xml:base="https://www.geckox.mx/2024/09/25/using-sentry-cron-monitors-in-ruby-on-rails.html"><![CDATA[<p>At work we have a Sentry subscription which we use primarily for issue tracking
but recently I noticed the “Crons” entry in the sidebar and decided to give it
a try as we have a bunch of Nomad <a href="https://developer.hashicorp.com/nomad/docs/job-specification/periodic">periodic jobs</a> that aren’t exactly easy
to monitor with the Nomad WUI.</p>

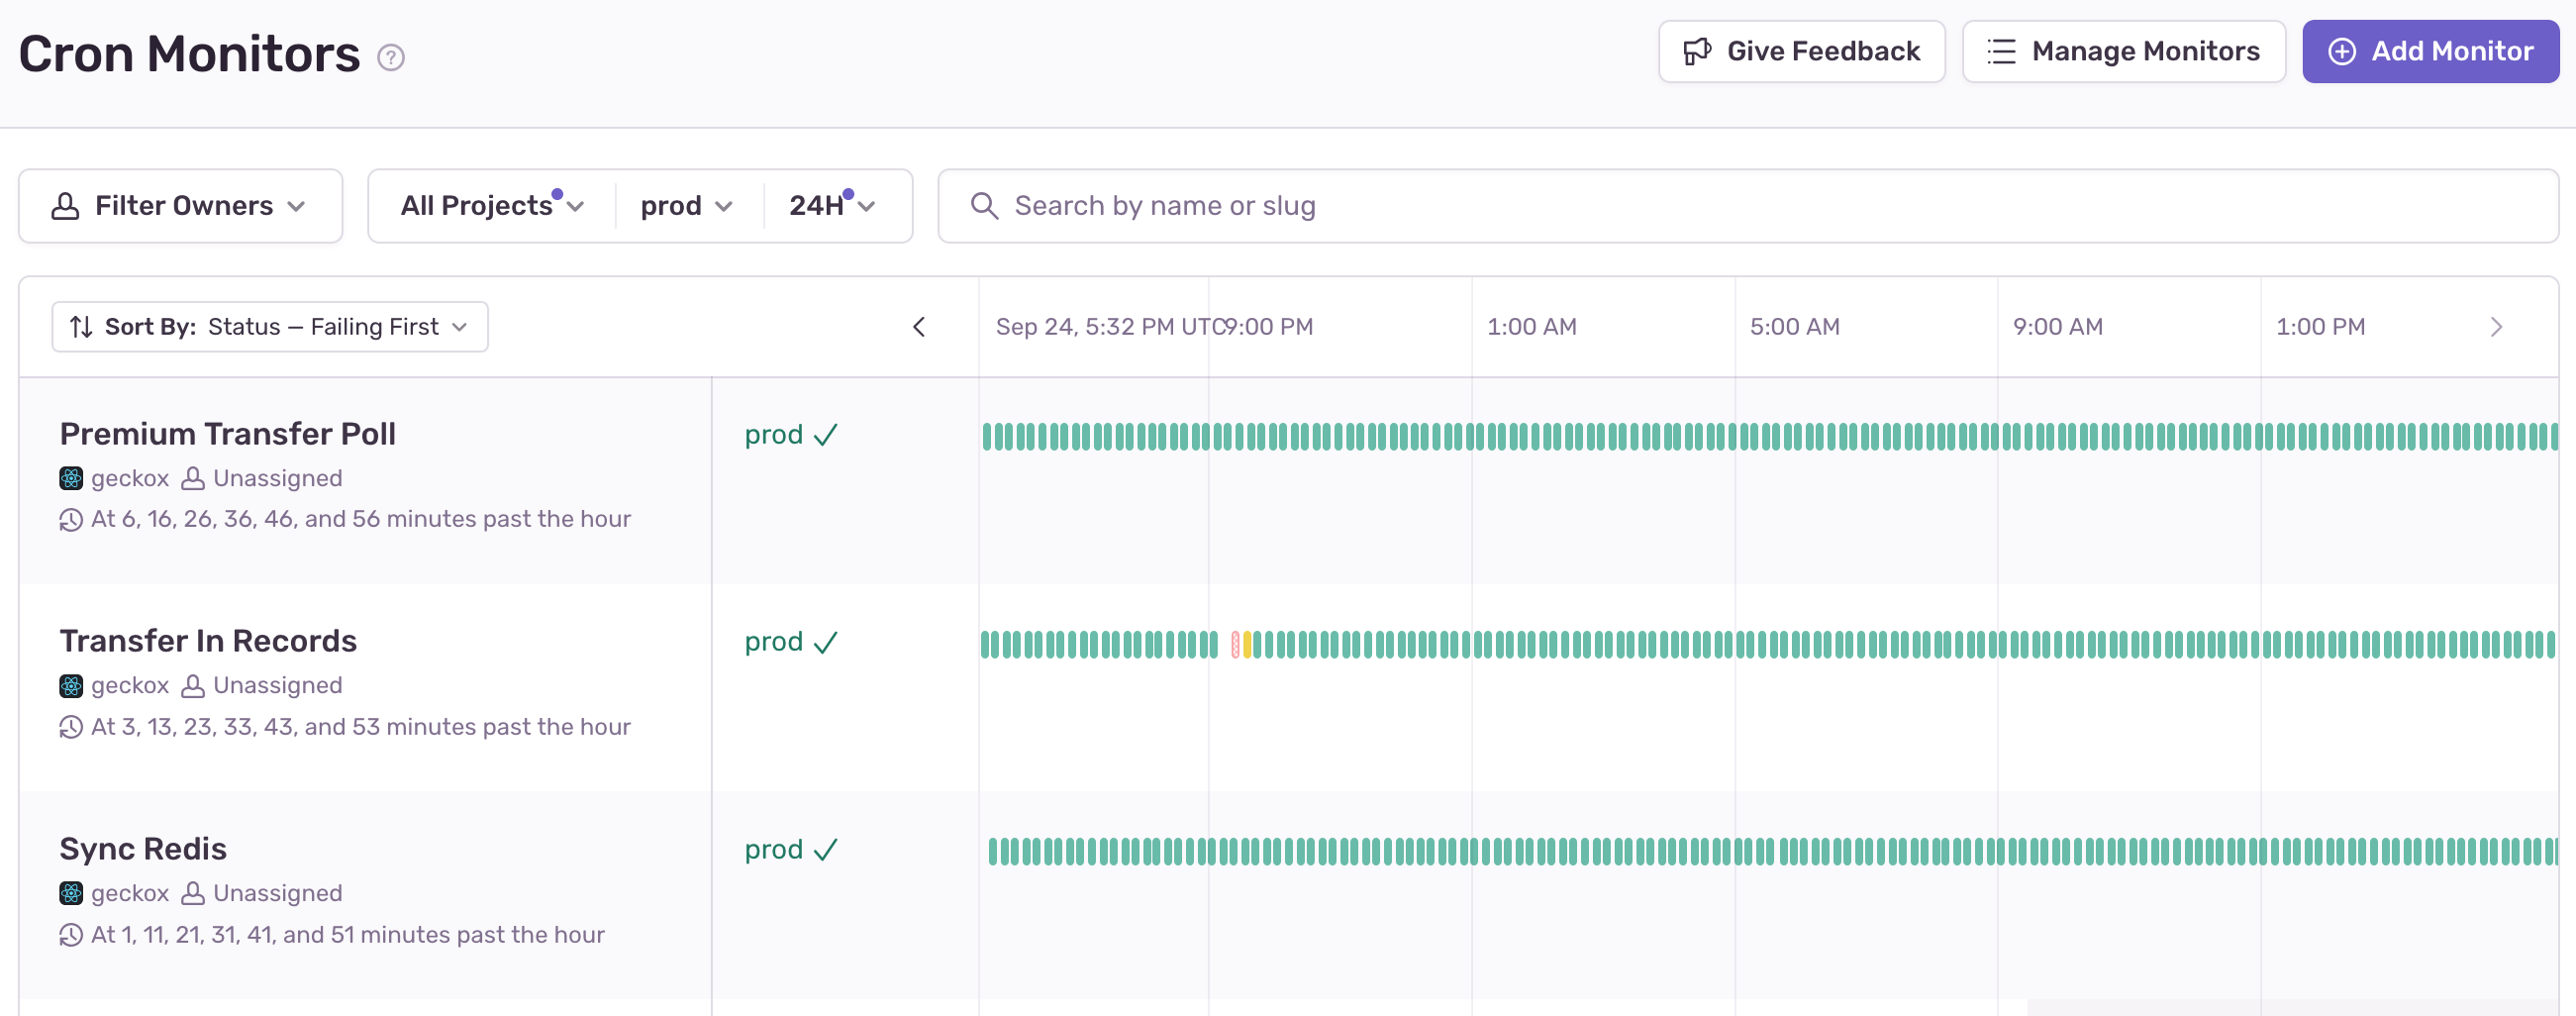
<figure>
  <img src="
/assets/images/cron_monitors.png
" alt="Screenshot of Sentry's Cron monitors page." loading="lazy" />

  <figcaption>Sentry highlights as red when an error occurred and yellow when an expected check-in was missed.</figcaption>

</figure>

<p>For context, our periodic jobs are basically invocations of
<code class="language-plaintext highlighter-rouge">bundle exec rake &lt;task&gt;</code> commands, so each task is running within a ruby
process and Sentry provides an easy to use API via their SDK.</p>

<p>The “<a href="https://docs.sentry.io/platforms/ruby/crons/">Set Up Crons</a>” document is straightforward and easy to follow. Given we’re
not using Sidekiq we couldn’t just <code class="language-plaintext highlighter-rouge">include</code> their modules and call it a day.
Instead we used the “Manual Setup” approach but it quickly became a repetitive
task to do a check-in for every job.</p>

<h2 id="upserting-cron-monitors">Upserting Cron Monitors</h2>

<p>We already have a YAML file used to provision the nomad jobs with a cron
schedule, command and per-environment resources. We added a few more properties
to support “upsert” easily:</p>

<ul>
  <li><code class="language-plaintext highlighter-rouge">slug</code>: used to identify Sentry monitors</li>
  <li><code class="language-plaintext highlighter-rouge">max_runtime</code>: to let Sentry know how long the job is expected to run</li>
  <li><code class="language-plaintext highlighter-rouge">checkin_margin</code>: we trust Nomad to spin-up the job on time but it doesn’t
hurt to add this measure.</li>
</ul>

<p>So the YAML file ended up looking like the following:</p>

<div class="augmented-highlight" augmented-ui="tl-clip t-clip-x tr-clip r-clip-y br-clip b-clip-x bl-clip l-clip-y exe">
<figure class="highlight"><pre><code class="language-yaml" data-lang="yaml"><span class="c1"># config/nomad_jobs.yml</span>
<span class="na">default</span><span class="pi">:</span> <span class="nl">&amp;default</span>
  <span class="na">cron</span><span class="pi">:</span> <span class="s2">"</span><span class="s">*</span><span class="nv"> </span><span class="s">*</span><span class="nv"> </span><span class="s">*</span><span class="nv"> </span><span class="s">*</span><span class="nv"> </span><span class="s">*"</span>
  <span class="c1"># Sentry cron monitors settings</span>
  <span class="na">checkin_margin</span><span class="pi">:</span> <span class="m">5</span> <span class="c1"># Optional check-in margin in minutes</span>
  <span class="na">max_runtime</span><span class="pi">:</span> <span class="m">15</span> <span class="c1"># minutes</span>

<span class="na">send_daily_reports</span><span class="pi">:</span>
  <span class="na">&lt;&lt;</span><span class="pi">:</span> <span class="nv">*default</span>
  <span class="na">cron</span><span class="pi">:</span> <span class="s2">"</span><span class="s">30</span><span class="nv"> </span><span class="s">15</span><span class="nv"> </span><span class="s">*</span><span class="nv"> </span><span class="s">*</span><span class="nv"> </span><span class="s">*"</span>
  <span class="na">command</span><span class="pi">:</span> <span class="s2">"</span><span class="s">bundle</span><span class="nv"> </span><span class="s">exec</span><span class="nv"> </span><span class="s">rake</span><span class="nv"> </span><span class="s">geckox:send_daily_reports"</span>
  <span class="na">slug</span><span class="pi">:</span> <span class="s2">"</span><span class="s">daily-reports"</span>
  <span class="na">max_runtime</span><span class="pi">:</span> <span class="m">3</span>

<span class="c1"># ...</span></code></pre></figure></div>

<p>And with this in place, we fully took advantage of Sentry’s <code class="language-plaintext highlighter-rouge">capture_check_in</code>
method:</p>

<div class="augmented-highlight" augmented-ui="tl-clip t-clip-x tr-clip r-clip-y br-clip b-clip-x bl-clip l-clip-y exe">
<figure class="highlight"><pre><code class="language-ruby" data-lang="ruby"><span class="k">module</span> <span class="nn">Geckox</span>
  <span class="k">class</span> <span class="o">&lt;&lt;</span> <span class="nb">self</span>
    <span class="c1"># Execute block within a Sentry cron check-in for the given slug.</span>
    <span class="c1">#</span>
    <span class="c1"># This will "upsert" the monitor if &lt;code&gt;slug&lt;/code&gt; is found in</span>
    <span class="c1"># &lt;code&gt;config/nomad_jobs.yml&lt;/code&gt;.</span>
    <span class="c1">#</span>
    <span class="c1"># @param slug [String] Slug matching a manually created Sentry monitor</span>
    <span class="c1"># @yield [] Block receives no arguments</span>
    <span class="c1">#</span>
    <span class="c1"># @see https://docs.sentry.io/platforms/ruby/crons/#manual-setup</span>
    <span class="c1"># @see https://docs.sentry.io/platforms/ruby/crons/#upserting-cron-monitors</span>
    <span class="k">def</span> <span class="nf">sentry_check_in</span><span class="p">(</span><span class="n">slug</span><span class="p">)</span>
      <span class="n">monitor_config</span> <span class="o">=</span> <span class="kp">nil</span>
      <span class="n">nomad_job</span> <span class="o">=</span> <span class="no">Rails</span><span class="p">.</span><span class="nf">configuration</span>
        <span class="p">.</span><span class="nf">nomad_jobs</span>
        <span class="p">.</span><span class="nf">select</span> <span class="p">{</span> <span class="o">|</span><span class="n">key</span><span class="o">|</span> <span class="no">Rails</span><span class="p">.</span><span class="nf">configuration</span><span class="p">.</span><span class="nf">nomad_jobs</span><span class="p">.</span><span class="nf">dig</span><span class="p">(</span><span class="n">key</span><span class="p">,</span> <span class="s2">"slug"</span><span class="p">)</span> <span class="o">==</span> <span class="n">slug</span> <span class="p">}</span>

      <span class="k">if</span> <span class="n">nomad_job</span><span class="p">.</span><span class="nf">present?</span>
        <span class="n">nomad_config</span> <span class="o">=</span> <span class="n">nomad_job</span><span class="p">.</span><span class="nf">values</span><span class="p">.</span><span class="nf">first</span>
        <span class="n">monitor_config</span> <span class="o">=</span> <span class="no">Sentry</span><span class="o">::</span><span class="no">Cron</span><span class="o">::</span><span class="no">MonitorConfig</span><span class="p">.</span><span class="nf">from_crontab</span><span class="p">(</span>
          <span class="n">nomad_config</span><span class="p">[</span><span class="s2">"cron"</span><span class="p">],</span>
          <span class="ss">checkin_margin: </span><span class="n">nomad_config</span><span class="p">[</span><span class="s2">"checkin_margin"</span><span class="p">],</span>
          <span class="ss">max_runtime: </span><span class="n">nomad_config</span><span class="p">[</span><span class="s2">"max_runtime"</span><span class="p">]</span>
        <span class="p">)</span>
      <span class="k">end</span>

      <span class="n">check_in_id</span> <span class="o">=</span> <span class="no">Sentry</span><span class="p">.</span><span class="nf">capture_check_in</span><span class="p">(</span><span class="n">slug</span><span class="p">,</span> <span class="ss">:in_progress</span><span class="p">,</span> <span class="ss">monitor_config: </span><span class="n">monitor_config</span><span class="p">)</span>
      <span class="k">yield</span>
      <span class="no">Sentry</span><span class="p">.</span><span class="nf">capture_check_in</span><span class="p">(</span><span class="n">slug</span><span class="p">,</span> <span class="ss">:ok</span><span class="p">,</span> <span class="ss">check_in_id: </span><span class="n">check_in_id</span><span class="p">,</span> <span class="ss">monitor_config: </span><span class="n">monitor_config</span><span class="p">)</span>
    <span class="k">rescue</span> <span class="o">=&gt;</span> <span class="n">e</span>
      <span class="k">if</span> <span class="k">defined?</span><span class="p">(</span><span class="n">check_in_id</span><span class="p">)</span>
        <span class="no">Sentry</span><span class="p">.</span><span class="nf">capture_check_in</span><span class="p">(</span><span class="n">slug</span><span class="p">,</span> <span class="ss">:error</span><span class="p">,</span> <span class="ss">check_in_id: </span><span class="n">check_in_id</span><span class="p">)</span>
      <span class="k">end</span>
      <span class="k">raise</span> <span class="n">e</span>
    <span class="k">end</span>
  <span class="k">end</span>
<span class="k">end</span>

<span class="c1"># To trigger a monitored job</span>
<span class="no">Geckox</span><span class="p">.</span><span class="nf">sentry_check_in</span><span class="p">(</span><span class="s2">"daily-reports"</span><span class="p">)</span> <span class="k">do</span>
  <span class="no">SendDailyReportsJob</span><span class="p">.</span><span class="nf">perform_now</span>
<span class="k">end</span></code></pre></figure></div>

<p>And with this in place, we got a nice UI informing us if something isn’t right
at a glance.</p>

<p>Additionally, whenever an error is raised from a periodic job, it’s
automatically linked from the monitor page to a Sentry issue with the relevant
context at hand. Great product integration!</p>]]></content><author><name>juankman94</name></author><category term="Ruby on Rails" /><category term="Sentry" /><category term="Cron" /><category term="Health check" /><summary type="html"><![CDATA[At work we have a Sentry subscription which we use primarily for issue tracking but recently I noticed the “Crons” entry in the sidebar and decided to give it a try as we have a bunch of Nomad periodic jobs that aren’t exactly easy to monitor with the Nomad WUI.]]></summary><media:thumbnail xmlns:media="http://search.yahoo.com/mrss/" url="https://www.geckox.mx/cron_monitors.png" /><media:content medium="image" url="https://www.geckox.mx/cron_monitors.png" xmlns:media="http://search.yahoo.com/mrss/" /></entry><entry xml:lang="en"><title type="html">Getting up to date: Upgrading webpacker</title><link href="https://www.geckox.mx/2024/04/04/getting-up-to-date-upgrading-webpacker.html" rel="alternate" type="text/html" title="Getting up to date: Upgrading webpacker" /><published>2024-04-04T19:18:00+00:00</published><updated>2024-04-04T19:18:00+00:00</updated><id>https://www.geckox.mx/2024/04/04/getting-up-to-date-upgrading-webpacker</id><content type="html" xml:base="https://www.geckox.mx/2024/04/04/getting-up-to-date-upgrading-webpacker.html"><![CDATA[<p>TL;DR: node 10 =&gt; node 18, webpacker 3.5 =&gt; shakapacker 7.1,
webpack 3 =&gt; webpack 5.</p>

<p>For over a year I’ve been working on an old Ruby on Rails application that
started around 2009, so it has many in-house Rails features because they were
not part of Rails yet.</p>

<p>Several years ago it started using React (and <a href="https://elm-lang.org/">Elm</a>, but thankfully that’s
no longer the case) with webpacker 3.5 and the JS instrumentation grew
explosively but webpacker was never updated — according to the main
branch of git, maybe there ware attempts but weren’t merged.</p>

<figure class="right d-w-2/3">
  <img src="
/assets/images/rails_maintenance.png
" alt="A mechanic is under a Volkswagen Beetle giving maintenance to the engine." loading="lazy" />

  <figcaption>Software can be beautiful with proper maintenance.</figcaption>

</figure>

<p>From my first day I had issues with tech debt as I was provided an M1 laptop
and couldn’t get the application running, as the dependencies were:</p>

<ul>
  <li>Ruby 2.6.6 – not compatible with M1. Maybe compatible with Rosetta? I
preferred the slow process of upgrading ruby rather than hoop around.</li>
  <li>Node 10 – not compatible with  M1</li>
  <li>Elm 19 – not compatible with M1 and no community. Not even with Docker
did the compiler work</li>
  <li>Webpacker 3.5 – abandoned project, replaced by <a href="https://github.com/shakacode/shakapacker">Shakapacker</a></li>
  <li>Ruby on Rails 5.2</li>
</ul>

<p>After a couple of months I upgraded ruby to v2.7 so that was running natively
in the hardware, but the huge front-end codebase lacked behind with lots
of flavors and dependencies intertwined: jQuery, React, in-house, Elm, SASS,
LESS, SCSS.
A senior developer on the team removed the Elm portions of the app right before
leaving the company and without him I don’t think I would’ve been able to
do this, I would’ve tagged this project as abandonware in my mind and moved on.</p>

<p>Hundreds of internal source files, thousands of vendor assets &amp; countless
NPM dependencies… it was a dire situation.</p>

<h2 id="different-experiments-multiple-attempts">Different Experiments, Multiple Attempts</h2>

<p>The adage says that we should upgrade one major version at a time. In this
case, though, I started by trying to upgrade node 10 to node 12 as it’s the
next LTS (Long Term Support) version – both versions were unmaintained at the
time.</p>

<p>This didn’t work as some NPM dependencies required <code class="language-plaintext highlighter-rouge">node &lt;= 10</code> and upgrading
dependencies broke a bunch of other things.</p>

<p>Next attempt was going to node 14 (unmaintained LTS) which allowed to upgrade
a lot of dependencies but there were still a crucial few which crushed this
attempt, <code class="language-plaintext highlighter-rouge">node-sass</code> among them which is also unmaintained.</p>

<p>I spent about a month installing thousands of dependencies, seeing log errors
and clearing busted docker images and cache layers…
At this point I felt <strong>defeated and abandoned</strong> the effort for a few months.</p>

<p>I continued working on other ruby/rails aspects of the application which gave
me confidence on how the application worked, how it failed and overall set
expectations on what was working and what didn’t, but none the less was
expected behavior.</p>

<h2 id="another-shot-with-clear-expectations">Another Shot With Clear Expectations</h2>

<p>So after about a 3 month long rest, I decided to give it another shot and to
look at webpacker as a black box and care only for the output assets, i.e.,
the output might be syntactically different but should otherwise produce
“equivalent” JS code. So I tried upgrading to node 18 (LTS and works on the M1).</p>

<p>It’s important to note I was prepared for the thousands of lines of error logs,
cryptic error messages and slow change-compile-repeat cycles. <strong>I consider
morale the most important factor for maintenance upgrades</strong>. Seeing so many
errors coming from files you didn’t know exist sucks the life out of you.</p>

<p>With this in mind, I set these expectations for myself:</p>

<ul>
  <li>JS <strong>MUST</strong> compile</li>
  <li>CSS <strong>MUST</strong> compile</li>
  <li><strong>MUST</strong> work natively on the M1</li>
  <li><strong>MUST NOT</strong> change the test suite expectations — as much as I dislike
how cumbersome selenium is, it’s an invaluable investment the previous
developers did for this application</li>
  <li>Minor customer-facing features <strong>MIGHT</strong> break and I will fix them
iteratively after the fact</li>
</ul>

<p>It became so much easier to chew the problem. It was still boring seeing a
compiler error, changing a file and checking again ad nauseam but it <strong>wasn’t
frustrating anymore</strong>. Most of the issues were SCSS syntax used in SASS files
and some asset location joggling, e.g., images, but after a few
weeks the code was compiling successfully and it became a red-green cycle with
the test suite. All in all, it took about a month to get a release candidate
branch which was daunting to review with around 650 files changed.</p>

<h2 id="simplifying-the-pull-request">Simplifying the Pull Request</h2>

<p>I like fixing things along the way when I work on something (who knows when
another opportunity will present itself) but with this PR (Pull Request) I
decided to make as few changes as possible <strong>AND</strong> also slip simple changes
to other PRs which were being merged regularly so instead of <strong>not fixing
issues along the way, I was fixing them earlier</strong>, e.g.:</p>

<div class="augmented-highlight" augmented-ui="tl-clip t-clip-x tr-clip r-clip-y br-clip b-clip-x bl-clip l-clip-y exe">
<figure class="highlight"><pre><code class="language-diff" data-lang="diff">   &lt;%- content_for(:js) do %&gt;
     &lt;script&gt;
<span class="gd">-      initFeatureSPA();
</span><span class="gi">+      window.addEventListener('DOMContentLoaded', function() { initFeatureSPA(); });
</span>     &lt;/script&gt;
   &lt;% end  -%&gt;</code></pre></figure></div>

<p>Something changed in the way JS assets were being loaded which meant <code class="language-plaintext highlighter-rouge">&lt;script&gt;</code>
elements were being executed before scripts finished loading (now they’re
deferred?). I don’t care enough to go and understand why but changing these JS
snippets to the Correct™ way fixed a lot of the failing tests
albeit added a lot of noise to the PR, so I merged them to the main branch
before the big upgrade, which made the review process much more manageable.</p>

<p>After all was said and done, the PR went from 656 files down to 140 – not
messing too much with webpack configuration being the biggest factor at play.</p>

<h2 id="conclusions">Conclusions</h2>

<p>It’s a daunting process and it may seem like an unworthy effort, but with
the right mindset it becomes an almost easy process. It’s just slow as hell.
I spent about 6 months with the multiple experiments and keeping the problem
in the back burner of my mind when not working on it –
it’s an iterative process!</p>

<h3 id="on-management">On Management</h3>

<p>Development aspects aside, Management™ was never onboard with all
of this. They weren’t openly against it but didn’t see the upside. From my
perspective, it improved my workflow tremendously as I no longer work with the
overhead of Docker’s VM (still use it for DB &amp; Redis) and the battery life of
my laptop is longer than a day now.</p>

<p>That’s probably why management doesn’t care. It doesn’t add business value
<strong>directly</strong>. But as part of this, I upgraded a bunch of dependencies, found
the root cause of recurring production issues and fixed many long-hanging-fruit
problems that would’ve otherwise remained in this codebase on the brink of
abandonware.</p>

<p>All this to say, as Developers™ we should try to address tech debt at
least indirectly even when lacking support from Management™ —
it makes our day to day much more enjoyable and allows us to add business value
at a faster rate.</p>

<hr />

<p class="attribution">
    "<a target="_blank" rel="noopener noreferrer" href="https://stocksnap.io/photo/beetle-buggy-A0737DFF83">Beetle Buggy</a>"
    by <a target="_blank" rel="noopener noreferrer" href="https://www.gratisography.com">Ryan McGuire</a>
    is marked with
    <a target="_blank" rel="noopener noreferrer" href="https://creativecommons.org/publicdomain/zero/1.0/?ref=openverse">
        CC0 1.0
        <img class="license-icon" src="https://mirrors.creativecommons.org/presskit/icons/cc.svg" />
        <img class="license-icon" src="https://mirrors.creativecommons.org/presskit/icons/zero.svg" />
    </a>.
</p>]]></content><author><name>juankman94</name></author><category term="software development" /><category term="tech debt" /><category term="webpacker" /><category term="shakapacker" /><summary type="html"><![CDATA[TL;DR: node 10 =&gt; node 18, webpacker 3.5 =&gt; shakapacker 7.1, webpack 3 =&gt; webpack 5.]]></summary><media:thumbnail xmlns:media="http://search.yahoo.com/mrss/" url="https://www.geckox.mx/rails_maintenance.png" /><media:content medium="image" url="https://www.geckox.mx/rails_maintenance.png" xmlns:media="http://search.yahoo.com/mrss/" /></entry><entry xml:lang="en"><title type="html">Optimize Docker build image in GitHub Actions</title><link href="https://www.geckox.mx/2023/10/17/optimize-docker-build-image-in-github-actions.html" rel="alternate" type="text/html" title="Optimize Docker build image in GitHub Actions" /><published>2023-10-17T01:13:00+00:00</published><updated>2023-10-17T01:13:00+00:00</updated><id>https://www.geckox.mx/2023/10/17/optimize-docker-build-image-in-github-actions</id><content type="html" xml:base="https://www.geckox.mx/2023/10/17/optimize-docker-build-image-in-github-actions.html"><![CDATA[<p>Building docker images on every deployment can be time consuming but there are
several ways to speed up the process.</p>

<h2 id="the-setup">The Setup</h2>

<p>At my current job we have a CI/CD pipeline that builds a Docker image that is
later deployed to replace the current version in production. It is a multi-step
process (<em>workflows</em>, in GH parlance) that used to consist of:</p>

<ol>
  <li>Run CI workflow (~50 minutes)
    <ol>
      <li>Make sure application is installable (using cache to optimize
dependencies downloads)</li>
      <li>Unit tests</li>
      <li>Integration tests (selenium)</li>
    </ol>
  </li>
  <li>Run CD workflow (~30 minutes)
    <ol>
      <li>Build image: some dependencies need to be compiled (~25 minutes)</li>
      <li>Deploy to production</li>
    </ol>
  </li>
</ol>

<p>The second workflow is run automatically by GH Actions when the first workflow
completes, i.e., <code class="language-plaintext highlighter-rouge">on: workflow_run</code> in the <a href="https://docs.github.com/en/actions/using-workflows/workflow-syntax-for-github-actions#onworkflow_runbranchesbranches-ignore">Workflow spec</a>, so we would need to
wait for about 1 hour and a half before we actually see our changes in
production.</p>

<h2 id="the-refactor">The Refactor</h2>

<figure>
  <img src="
/assets/images/ci_workflow.png
" alt="Workflow graph generated by GitHub Actions." loading="lazy" />

  <figcaption>After refactoring, the CI workflow diagram looks like this.</figcaption>

</figure>

<p>Since we use Docker for the build process, there’s already a tried and tested
cache layer that I know we were not taking advantage of. After <a href="https://duckduckgo.com">ducking</a> around
a bit, I arrived at Docker’s <a href="https://docs.docker.com/build/cache/backends/gha/">GitHub Actions cache</a> documentation which outlines
the (currently experimental) integration with Actions’ cache. To optimize image
caching I decided to split the image into two:</p>

<ol>
  <li><strong>base</strong>: install system dependencies, e.g., runtimes and dependencies
that need to be compiled and don’t change as often, e.g., HTTP server.</li>
  <li><strong>application</strong>: install dependencies that can simply be downloaded
or change more often.</li>
</ol>

<p>After testing locally this reduced the build process from 20 to ~5 minutes, but
when merged to the main branch and tested in the GH Actions servers, the cache
didn’t work as expected.</p>

<p>This is because GH Actions cache was being created on the feature branch but,
after merging, it would not be picked up by the main branch build process.
There were multiple ways to solve this but I decided to restructure the
pipeline to run some steps in parallel:</p>

<ol>
  <li>Run CI workflow (~50 minutes): all steps in parallel
    <ol>
      <li>Build image <strong>only for main branch</strong></li>
      <li>Unit tests</li>
      <li>Integration tests</li>
    </ol>
  </li>
  <li>Run CD workflow (~5 minutes)
    <ol>
      <li>Deploy to production</li>
    </ol>
  </li>
</ol>

<p>With the new layout the CI process still takes a long time (due to selenium
tests) but the whole pipeline runtime was reduced by about 30 minutes.</p>

<p>The above mentioned pipeline doesn’t illustrate that the “Build image” step
is actually building both the base image and the application image which can
be improved further by <strong>NOT</strong> building the base (i.e., go straight to cache)
image <strong>unless</strong> specific files changed. In our case, we want to build the base
image only if the <em>base Dockerfile</em> changes. To achieve this, I used the
<a href="https://github.com/dorny/paths-filter">dorny/paths-filter</a> action to detect changes on specific files, further
reducing the processing needed to build the <em>application image</em>.</p>

<h2 id="the-rails">The Rails</h2>

<p>This setup was conceived specifically for a Ruby on Rails application with
several gems that require a compilation with native extensions which is a
redundant step for dependencies like <a href="https://rubygems.org/gems/puma">puma</a> or <a href="https://rubygems.org/gems/sassc">sassc</a> that rarely change.
So at the end of <code class="language-plaintext highlighter-rouge">Dockerfile.base</code>, after all “OS” dependencies have been
installed, we install these gems individually which will become <code class="language-plaintext highlighter-rouge">CACHED</code>
layers for the image build process, e.g.:</p>

<div class="augmented-highlight" augmented-ui="tl-clip t-clip-x tr-clip r-clip-y br-clip b-clip-x bl-clip l-clip-y exe">
<figure class="highlight"><pre><code class="language-docker" data-lang="docker"><span class="k">FROM</span><span class="w"> </span><span class="s">--platform=linux/amd64 debian:12-slim</span><span class="w"> </span><span class="k">AS</span><span class="w"> </span><span class="s">geckox</span>

<span class="k">RUN </span>apt-get update <span class="nt">-q</span> <span class="o">&amp;&amp;</span> apt-get <span class="nb">install</span> <span class="nt">-qqqqy</span> ...

...

<span class="k">RUN </span>gem <span class="nb">install</span> <span class="nt">--no-document</span> puma <span class="nt">-v</span> 6.4.0
<span class="k">RUN </span>gem <span class="nb">install</span> <span class="nt">--no-document</span> sassc <span class="nt">-v</span> 2.4.0</code></pre></figure></div>

<p>As a rule of thumb (which I break when my setup grows), I <strong>DO NOT</strong> include
<a href="https://docs.docker.com/engine/reference/builder/#add">ADD</a> or <a href="https://docs.docker.com/engine/reference/builder/#copy">COPY</a> statements in my <code class="language-plaintext highlighter-rouge">Dockerfile.base</code> file to avoid unintentional
layer cache expiration; I add those to the <code class="language-plaintext highlighter-rouge">Dockerfile.app</code> image which usually
copies the application code to the image.</p>

<h2 id="the-ci-workflow">The CI Workflow</h2>

<p>After all was said and done, the CI workflow looked something like this:</p>

<div class="augmented-highlight" augmented-ui="tl-clip t-clip-x tr-clip r-clip-y br-clip b-clip-x bl-clip l-clip-y exe">
<figure class="highlight"><pre><code class="language-yaml" data-lang="yaml"><span class="na">name</span><span class="pi">:</span> <span class="s">CI</span>
<span class="na">on</span><span class="pi">:</span> <span class="s">push</span>

<span class="na">jobs</span><span class="pi">:</span>
  <span class="na">setup</span><span class="pi">:</span>
    <span class="na">steps</span><span class="pi">:</span>
      <span class="pi">-</span> <span class="s">Download dependencies...</span>

  <span class="na">tests</span><span class="pi">:</span>
    <span class="na">steps</span><span class="pi">:</span>
      <span class="pi">-</span> <span class="s">...</span>

  <span class="na">integration_tests</span><span class="pi">:</span>
    <span class="na">steps</span><span class="pi">:</span>
      <span class="pi">-</span> <span class="s">...</span>

  <span class="c1"># Build docker images only for main</span>
  <span class="na">build_base_image</span><span class="pi">:</span>
    <span class="na">if</span><span class="pi">:</span> <span class="s">${{ github.ref == 'refs/heads/main' }}</span>
    <span class="na">env</span><span class="pi">:</span>
      <span class="na">REGISTRY</span><span class="pi">:</span> <span class="s">ghcr.io</span>
      <span class="na">IMAGE_NAME</span><span class="pi">:</span> <span class="s">orgname/geckox/geckox-base-image</span>
    <span class="na">permissions</span><span class="pi">:</span>
      <span class="na">contents</span><span class="pi">:</span> <span class="s">read</span>
      <span class="na">packages</span><span class="pi">:</span> <span class="s">write</span>

    <span class="na">steps</span><span class="pi">:</span>
      <span class="pi">-</span> <span class="na">name</span><span class="pi">:</span> <span class="s">Checkout repository</span>
        <span class="na">uses</span><span class="pi">:</span> <span class="s">actions/checkout@v2</span>

      <span class="c1"># dorny/paths-filter (git) errors out because of "dubious ownership in repository"</span>
      <span class="pi">-</span> <span class="na">name</span><span class="pi">:</span> <span class="s2">"</span><span class="s">Change</span><span class="nv"> </span><span class="s">repository</span><span class="nv"> </span><span class="s">directory</span><span class="nv"> </span><span class="s">permissions"</span>
        <span class="na">run</span><span class="pi">:</span> <span class="pi">|</span>
          <span class="s">git config --global --add safe.directory /data/runners/geckox/work/geckox/geckox || true</span>

      <span class="c1"># https://github.com/dorny/paths-filter</span>
      <span class="pi">-</span> <span class="na">name</span><span class="pi">:</span> <span class="s">Check Dockerfile.base</span>
        <span class="na">id</span><span class="pi">:</span> <span class="s">changes_filter</span>
        <span class="na">uses</span><span class="pi">:</span> <span class="s">dorny/paths-filter@v2</span>
        <span class="na">with</span><span class="pi">:</span>
          <span class="na">filters</span><span class="pi">:</span> <span class="pi">|</span>
            <span class="s">dockerfile_base:</span>
              <span class="s">- added|modified: 'build/Dockerfile.base'</span>

      <span class="pi">-</span> <span class="na">name</span><span class="pi">:</span> <span class="s">Set up Docker Buildx</span>
        <span class="na">uses</span><span class="pi">:</span> <span class="s">docker/setup-buildx-action@v2</span>

      <span class="pi">-</span> <span class="na">name</span><span class="pi">:</span> <span class="s">Log in to the Container registry</span>
        <span class="na">uses</span><span class="pi">:</span> <span class="s">docker/login-action@v2</span>
        <span class="na">with</span><span class="pi">:</span>
          <span class="na">registry</span><span class="pi">:</span> <span class="s">${{ env.REGISTRY }}</span>
          <span class="na">username</span><span class="pi">:</span> <span class="s">${{ github.actor }}</span>
          <span class="na">password</span><span class="pi">:</span> <span class="s">${{ secrets.GITHUB_TOKEN }}</span>

      <span class="pi">-</span> <span class="na">name</span><span class="pi">:</span> <span class="s">Skip image build process for Dockerfile.base</span>
        <span class="na">if</span><span class="pi">:</span> <span class="s">steps.changes_filter.outputs.dockerfile_base == 'false'</span>
        <span class="na">run</span><span class="pi">:</span> <span class="s">echo "Skipping..."</span>

      <span class="c1"># https://github.com/docker/build-push-action/tree/v4</span>
      <span class="pi">-</span> <span class="na">name</span><span class="pi">:</span> <span class="s">Build and push Docker image</span>
        <span class="na">if</span><span class="pi">:</span> <span class="s">steps.changes_filter.outputs.dockerfile_base == 'true'</span>
        <span class="na">uses</span><span class="pi">:</span> <span class="s">docker/build-push-action@v4</span>
        <span class="na">with</span><span class="pi">:</span>
          <span class="na">context</span><span class="pi">:</span> <span class="s">.</span>
          <span class="na">push</span><span class="pi">:</span> <span class="kc">true</span>
          <span class="na">cache-from</span><span class="pi">:</span> <span class="s">type=gha</span>
          <span class="na">cache-to</span><span class="pi">:</span> <span class="s">type=gha,mode=max</span>
          <span class="na">file</span><span class="pi">:</span> <span class="s">build/Dockerfile.base</span>
          <span class="na">tags</span><span class="pi">:</span> <span class="pi">|</span>
            <span class="s">${{ env.REGISTRY }}/${{ env.IMAGE_NAME }}:latest</span>

  <span class="na">build_image</span><span class="pi">:</span>
    <span class="na">needs</span><span class="pi">:</span> <span class="s">build_base_image</span>
    <span class="na">if</span><span class="pi">:</span> <span class="s">${{ github.ref == 'refs/heads/main' }}</span>
    <span class="na">env</span><span class="pi">:</span>
      <span class="na">REGISTRY</span><span class="pi">:</span> <span class="s">ghcr.io</span>
      <span class="na">IMAGE_NAME</span><span class="pi">:</span> <span class="s">orgname/geckox/geckox-app</span>
      <span class="na">GITHUB_SHA</span><span class="pi">:</span> <span class="s">${{ github.sha }}</span>
    <span class="na">permissions</span><span class="pi">:</span>
      <span class="na">contents</span><span class="pi">:</span> <span class="s">read</span>
      <span class="na">packages</span><span class="pi">:</span> <span class="s">write</span>

    <span class="na">steps</span><span class="pi">:</span>
      <span class="pi">-</span> <span class="na">name</span><span class="pi">:</span> <span class="s">Checkout repository</span>
        <span class="na">uses</span><span class="pi">:</span> <span class="s">actions/checkout@v2</span>

      <span class="pi">-</span> <span class="na">name</span><span class="pi">:</span> <span class="s">Set up Docker Buildx</span>
        <span class="na">uses</span><span class="pi">:</span> <span class="s">docker/setup-buildx-action@v2</span>

      <span class="pi">-</span> <span class="na">name</span><span class="pi">:</span> <span class="s">Log in to the Container registry</span>
        <span class="na">uses</span><span class="pi">:</span> <span class="s">docker/login-action@v2</span>
        <span class="na">with</span><span class="pi">:</span>
          <span class="na">registry</span><span class="pi">:</span> <span class="s">${{ env.REGISTRY }}</span>
          <span class="na">username</span><span class="pi">:</span> <span class="s">${{ github.actor }}</span>
          <span class="na">password</span><span class="pi">:</span> <span class="s">${{ secrets.GITHUB_TOKEN }}</span>

      <span class="pi">-</span> <span class="na">name</span><span class="pi">:</span> <span class="s">Set IMAGE_TAG variable</span>
        <span class="na">run</span><span class="pi">:</span> <span class="pi">|</span>
          <span class="s">echo "IMAGE_TAG=$GITHUB_SHA"</span>
          <span class="s">echo "IMAGE_TAG=$GITHUB_SHA" &gt;&gt; $GITHUB_ENV</span>

      <span class="c1"># https://github.com/docker/build-push-action/tree/v4</span>
      <span class="pi">-</span> <span class="na">name</span><span class="pi">:</span> <span class="s">Build and push Docker image</span>
        <span class="na">uses</span><span class="pi">:</span> <span class="s">docker/build-push-action@v4</span>
        <span class="na">with</span><span class="pi">:</span>
          <span class="na">context</span><span class="pi">:</span> <span class="s">.</span>
          <span class="na">push</span><span class="pi">:</span> <span class="kc">true</span>
          <span class="na">cache-from</span><span class="pi">:</span> <span class="s">type=gha</span>
          <span class="na">cache-to</span><span class="pi">:</span> <span class="s">type=gha,mode=max</span>
          <span class="na">file</span><span class="pi">:</span> <span class="s">build/Dockerfile.app</span>
          <span class="na">build-args</span><span class="pi">:</span> <span class="pi">|</span>
            <span class="s">BASE_TAG=latest</span>
          <span class="na">tags</span><span class="pi">:</span> <span class="pi">|</span>
            <span class="s">${{ env.REGISTRY }}/${{ env.IMAGE_NAME }}:latest</span>
            <span class="s">${{ env.REGISTRY }}/${{ env.IMAGE_NAME }}:${{ env.IMAGE_TAG }}</span></code></pre></figure></div>]]></content><author><name>juankman94</name></author><category term="github-actions" /><category term="ci" /><category term="docker" /><category term="github" /><summary type="html"><![CDATA[Building docker images on every deployment can be time consuming but there are several ways to speed up the process.]]></summary><media:thumbnail xmlns:media="http://search.yahoo.com/mrss/" url="https://www.geckox.mx/ci_workflow.png" /><media:content medium="image" url="https://www.geckox.mx/ci_workflow.png" xmlns:media="http://search.yahoo.com/mrss/" /></entry><entry xml:lang="en"><title type="html">Running Slackware on a Thinkpad A485</title><link href="https://www.geckox.mx/2023/08/31/slackware-linux-on-a-thinkpad-a485.html" rel="alternate" type="text/html" title="Running Slackware on a Thinkpad A485" /><published>2023-08-31T17:00:00+00:00</published><updated>2023-08-31T17:00:00+00:00</updated><id>https://www.geckox.mx/2023/08/31/slackware-linux-on-a-thinkpad-a485</id><content type="html" xml:base="https://www.geckox.mx/2023/08/31/slackware-linux-on-a-thinkpad-a485.html"><![CDATA[<p>My (rough &amp; rowdy) experience using Slackware on a <a href="https://www.lenovo.com/us/en/laptops/thinkpad/thinkpad-a-series/ThinkPad-A485/p/22TP2TAA485">Thinkpad A485</a>.</p>

<p><em>Update 2024-10-01</em>: I got a <a href="https://frame.work/products/laptop-diy-13-gen-amd/configuration/new">Framework Laptop 13</a> because the Thinkpad’s
display quality was jarring after interchanged use with macbook laptops.
A lot of the steps detailed here have been revisited for slackware64-current
unless noted otherwise.</p>

<p>This isn’t as straightforward compared to other distros, but once you’re
familiar with the process it isn’t too complicated. First of all you need to
get an ISO for the version you want to install. If you go to the <a href="http://www.slackware.com/getslack/">Get Slack</a>
page you’re told to download from one of the mirrors, i.e.,
<a href="https://mirrors.slackware.com/">https://mirrors.slackware.com/</a>. After a few
more clicks you end up in the official mirror’s
<a href="https://mirrors.slackware.com/slackware/slackware-iso/">directory for slackware ISOs</a>.
I’m gonna use <code class="language-plaintext highlighter-rouge">slackware64-15.0-iso</code>.</p>

<h2 id="making-the-bootable-usb">Making the Bootable USB</h2>

<p>These ISOs are intended to be used for DVD installation, which isn’t very
common as of this writing. After you download the ISO you can mount it in your
computer to get the USB installation image by reading the
<a href="https://mirrors.slackware.com/slackware/slackware64-15.0/usb-and-pxe-installers/README_USB.TXT">usb-and-pxe-installers/README_USB.txt</a> file. I’m gonna summarize what I do:</p>

<ul>
  <li>Mount the ISO, i.e.: <code class="language-plaintext highlighter-rouge">$ mount $HOME/downloads/slackware-15.0-install-dvd.iso /mnt/dvd</code></li>
  <li>Burn the bootable image to an USB drive, i.e.:
<code class="language-plaintext highlighter-rouge">$ dd if=/mnt/dvd/usb-and-pxe-installers/usbboot.img of=/dev/sdb bs=1M status=progress</code></li>
  <li>Burn the ISO itself to another USB drive, i.e.:
<code class="language-plaintext highlighter-rouge">$ dd if=$HOME/downloads/slackware-15.0-install-dvd.iso of=/dev/sdc bs=1M status=progress</code></li>
</ul>

<p>My bootable USB couldn’t load the kernel properly (not enough memory to load
initrd), so I had to pass some parameters to the boot line:</p>

<div class="augmented-highlight" augmented-ui="tl-clip t-clip-x tr-clip r-clip-y br-clip b-clip-x bl-clip l-clip-y exe">
<figure class="highlight"><pre><code class="language-shell" data-lang="shell">boot: huge.s noapic <span class="nv">mem</span><span class="o">=</span>2048M</code></pre></figure></div>

<h2 id="installation">Installation</h2>

<p>The idea is to mount the second USB in a directory <strong>before</strong> running
<code class="language-plaintext highlighter-rouge">setup</code> and then entering that directory path when asked:</p>

<div class="augmented-highlight" augmented-ui="tl-clip t-clip-x tr-clip r-clip-y br-clip b-clip-x bl-clip l-clip-y exe">
<figure class="highlight"><pre><code class="language-sh" data-lang="sh">% <span class="nb">mkdir</span> /usb
% mount /dev/sdc1 /usb
% <span class="nb">ls</span> /usb/slackware64
CHECKSUMS.md5 CHECKSUMS.md5.asc FILE_LIST MANIFEST.bz2 PACKAGES.TXT
a/ ap/ d/ e/ f/ k/ kde/ l/ n/ t/ tcl/ x/ xap/ xfce/ y/</code></pre></figure></div>

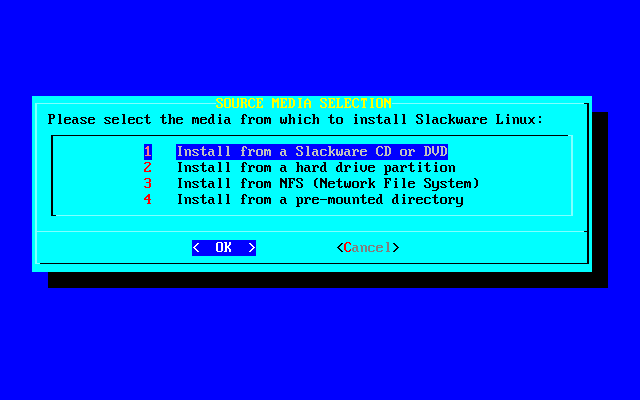
<p>When asked for the <code class="language-plaintext highlighter-rouge">SOURCE</code> pre-mounted directory, you should input
<code class="language-plaintext highlighter-rouge">/usb/slackware64</code>.</p>

<figure>
  <img src="/assets/images/setup-source-w.png" alt="Screenshot from the SOURCE MEDIA SELECTION step from the setup program" loading="lazy" />

  <figcaption>In the source media selection screen, select the "Install from a pre-mounted directory"</figcaption>

</figure>

<p>After booting the installation USB (UEFI, legacy BIOS or whatever) and
following the partitioning instructions (read the <a href="https://mirrors.kernel.org/slackware/slackware64-15.0/Slackware-HOWTO">Slackware-HOWTO</a> file at
least twice), you will run the <a href="http://slackbook.org/html/installation-setup.html">setup program</a>.</p>

<p>After selecting your <code class="language-plaintext highlighter-rouge">TARGET</code> partition table, you need to specify a <code class="language-plaintext highlighter-rouge">SOURCE</code>
for the programs you want in your system, which is where the second USB comes
to play.</p>

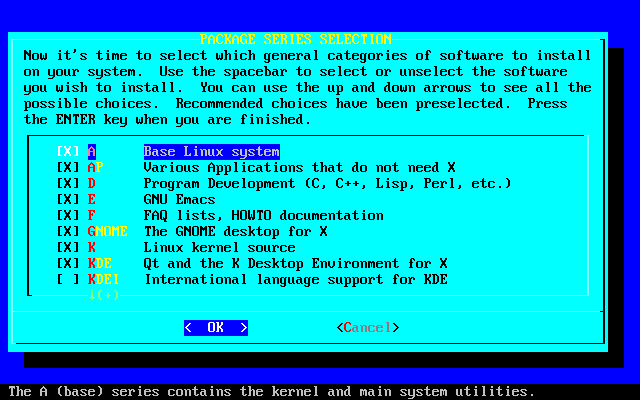
<p><strong>NOTE</strong>: if you don’t see all the series options in the <code class="language-plaintext highlighter-rouge">SELECT</code> step, the
pre-mounted directory wasn’t configured correctly.</p>

<figure>
  <img src="/assets/images/setup-select-w.png" alt="Screenshot from the PACKAGE SERIES SELECTION step from the setup program" loading="lazy" />

  <figcaption>You can toggle which series to install in the base system, e.g., check the XFCE desktop environment and uncheck KDE if you're planning to use XFCE.</figcaption>

</figure>

<h3 id="kernel-parameters">Kernel Parameters</h3>

<p>After the setup program completes installing the software series, you might
want to generate an initrd (read the <a href="https://mirrors.kernel.org/slackware/slackware64-15.0/README.initrd">README.initrd</a> file).</p>

<p>For this hardware I also needed to <code class="language-plaintext highlighter-rouge">append</code> some parameters to the kernel on
boot via <code class="language-plaintext highlighter-rouge">lilo.conf(5)</code>, after all is said and done, my append line looks
like this:</p>

<div class="augmented-highlight" augmented-ui="tl-clip t-clip-x tr-clip r-clip-y br-clip b-clip-x bl-clip l-clip-y exe">
<figure class="highlight"><pre><code class="language-conf" data-lang="conf"><span class="n">append</span> = <span class="s2">"noapic resume=/dev/slax/swap acpi_osi=Linux acpi_backlight=vendor i8042.direct i8042.dumbkbd "</span></code></pre></figure></div>

<ul>
  <li><code class="language-plaintext highlighter-rouge">noapic</code> is set so the kernel can detect the hardware properly</li>
  <li><code class="language-plaintext highlighter-rouge">resume=/dev/slax/swap</code> where to look for an image after suspension</li>
  <li><code class="language-plaintext highlighter-rouge">acpi_osi=Linux acpi_backlight=vendor</code> are set so the kernel can change the display’s brightness</li>
  <li><code class="language-plaintext highlighter-rouge">i8042.direct i8042.dumbkbd</code> A485’s keyboard [hardware] interface is messed up, this helps. You
also need to update your BIOS because the keyboard will send your key presses to the kernel
<strong>out of order</strong> — I don’t know why the hardware behaves this way, but it does</li>
</ul>

<h3 id="slackware-142-and-older">Slackware 14.2 and older</h3>

<p>For starters, the slackware 14.2 ISO uses linux kernel 4.4.16 (?), which
does <strong>NOT</strong> support the wireless card, so you need to upgrade the kernel using
an ethernet connection.</p>

<p>And after that, you need to install the wireless card drivers separately, since
they’re not in the linux tree yet. Fortunately, <a href="https://github.com/lwfinger">lwfinger</a> uploaded the driver
code to github: <a href="https://github.com/lwfinger/rtlwifi_new">lwfinger/rtlwifi_new</a>. Which seems to be down as of this
writing but if you contact me I can send you the code.
The README explains it all: minimum kernel version requirement, you need to
rebuild the driver whenever you change kernel version, etc.</p>

<h2 id="x">X</h2>

<p>The default sensitivity for the touchpad is way too high, i.e., it’s <em>very</em>
sensitive. Whenever I’m typing something if something as thin as a hair touches
(okay, maybe not so thin) the touchpad, it will move the cursor <strong>AND</strong> click
on stuff. Annoying things happen, like pasting of clipboard’s content, random
text selection, input focus loss, etc.</p>

<p>Browsing around I stumbled upon a <a href="https://forums.linuxmint.com/viewtopic.php?t=145283">Linux Mint forum thread</a>, which in turn
points to <a href="https://www.x.org/archive/X11R7.6/doc/man/man4/synaptics.4.xhtml">synaptics(4)</a> where you can read the driver’s configuration options.
Someone pointed out that you the <code class="language-plaintext highlighter-rouge">Synaptics Finger</code> option affects touchpad
sensitivity (someone else says the “Hysteresis” options help, I think those are
tweaked via de <code class="language-plaintext highlighter-rouge">Noise Cancellation</code> option)</p>

<p>As per the man page, <code class="language-plaintext highlighter-rouge">Synaptics Finger</code> takes three 32-bit values, from reading
between lines I gather that those values represent:</p>

<ol>
  <li><code class="language-plaintext highlighter-rouge">FingerLow</code>: when pressure goes below this value, count as release.</li>
  <li><code class="language-plaintext highlighter-rouge">FingerHigh</code>: when pressure goes above this value, count as touch.</li>
  <li><code class="language-plaintext highlighter-rouge">Pressure Motion</code>: read the man page, it’s a bit nuanced
(or it may be something else <code class="language-plaintext highlighter-rouge">¯\_(ツ)_/¯</code>).</li>
</ol>

<p>As a rule, <code class="language-plaintext highlighter-rouge">FingerLow</code> <strong>MUST</strong> be lower than <code class="language-plaintext highlighter-rouge">FingerHigh</code> (duh).</p>

<div class="augmented-highlight" augmented-ui="tl-clip t-clip-x tr-clip r-clip-y br-clip b-clip-x bl-clip l-clip-y exe">
<figure class="highlight"><pre><code class="language-sh" data-lang="sh">% <span class="nb">echo</span> <span class="s2">"Check your hardware and it's id"</span>
% xinput <span class="nt">--list</span>
...
<span class="o">&gt;</span>   <span class="k">*</span> SynPS/2 Synaptics TouchPad                <span class="nb">id</span><span class="o">=</span>12   <span class="o">[</span>slave  pointer  <span class="o">(</span>2<span class="o">)]</span>
<span class="o">&gt;</span>   <span class="k">*</span> TPPS/2 IBM TrackPoint                     <span class="nb">id</span><span class="o">=</span>13   <span class="o">[</span>slave  pointer  <span class="o">(</span>2<span class="o">)]</span>
...
% <span class="nb">echo</span> <span class="s2">"So we know that the touchpad is using synaptics and it's id is 12"</span>
% xinput <span class="nt">--list-props</span> 12 | less
Device <span class="s1">'SynPS/2 Synaptics TouchPad'</span>:
        Device Enabled <span class="o">(</span>134<span class="o">)</span>:   1
...
        Synaptics Finger <span class="o">(</span>267<span class="o">)</span>: 24, 36, 48
...
% <span class="nb">echo</span> <span class="s2">"The idea is to play around with these values, so play"</span>
% xinput <span class="nt">--set-prop</span> 12 267 42 48 192
<span class="sb">```</span></code></pre></figure></div>

<p>Honestly, I’m still not sure how the third value affects the touchpad’s
behaviour, so I still tweak these values from time to time.</p>

<h3 id="screen-brightness">Screen Brightness</h3>

<p>A feature I love from phones is that automatic screen color temperature
on the environment or time of day. Something similar can be achieved for X11
using the <a href="https://ports.to/path/x11/sct.html">sct</a> (screen color temperature) utility; can be done manually or via
a cron job.</p>

<p>I use the following ruby script:</p>

<div class="augmented-highlight" augmented-ui="tl-clip t-clip-x tr-clip r-clip-y br-clip b-clip-x bl-clip l-clip-y exe">
<figure class="highlight"><pre><code class="language-ruby" data-lang="ruby"><span class="c1">#!/usr/bin/env ruby</span>
<span class="c1"># Change screen color temperature (sct(1)) automatically depending</span>
<span class="c1"># on current time of day.</span>
<span class="c1">#</span>
<span class="c1"># Meant to be invoked by crontab(1), e.g.: `0 * * * * /path/to/ruby-script`</span>
<span class="c1">#</span>
<span class="c1"># @see https://crontab.guru/ Sensical cron schedule editor</span>

<span class="no">COLD_TEMPERATURE</span> <span class="o">=</span> <span class="mi">6500</span>
<span class="no">WARM_TEMPERATURE</span> <span class="o">=</span> <span class="mi">5000</span>

<span class="nb">require</span> <span class="s1">'time'</span>

<span class="n">now</span> <span class="o">=</span> <span class="no">Time</span><span class="p">.</span><span class="nf">now</span>
<span class="n">temperature</span> <span class="o">=</span> <span class="no">COLD_TEMPERATURE</span>
<span class="n">temperature</span> <span class="o">=</span> <span class="no">WARM_TEMPERATURE</span> <span class="k">if</span> <span class="n">now</span><span class="p">.</span><span class="nf">hour</span> <span class="o">&lt;</span> <span class="mi">8</span> <span class="o">||</span> <span class="n">now</span><span class="p">.</span><span class="nf">hour</span> <span class="o">&gt;=</span> <span class="mi">18</span>

<span class="nb">exec</span><span class="p">(</span><span class="s2">"sct </span><span class="si">#{</span><span class="n">temperature</span><span class="si">}</span><span class="s2">"</span><span class="p">)</span></code></pre></figure></div>

<h3 id="window-manager">Window Manager</h3>

<p><a href="https://awesomewm.org/">awesomewm</a> via <a href="https://slackbuilds.org/repository/14.2/desktop/awesome/">slackbuilds</a>.</p>

<h3 id="screen-resolution">Screen Resolution</h3>

<p>The framework laptop has a big display. The biggest I’ve ever used on a laptop,
so as great as the resolution is, I can’t see shit. Since I’m not using XFCE or
KDE which have controls to adjust the rendering scale, I had to figure out how
to increase the size of text for the whole system. Naturally, this is
configured via the X server.</p>

<p>I found a great <a href="https://winaero.com/find-change-screen-dpi-linux/">tutorial</a>
to do just that. These are the steps I did while following the instructions:</p>

<div class="augmented-highlight" augmented-ui="tl-clip t-clip-x tr-clip r-clip-y br-clip b-clip-x bl-clip l-clip-y exe">
<figure class="highlight"><pre><code class="language-sh" data-lang="sh"><span class="nv">$ </span>xdpyinfo | <span class="nb">grep</span> <span class="nt">-B2</span> resolution
screen <span class="c">#0:</span>
  dimensions:    2256x1504 pixels <span class="o">(</span>596x397 millimeters<span class="o">)</span>
  resolution:    96x96 dots per inch
<span class="nv">$ </span><span class="nb">echo</span> <span class="s2">"Calculating ideal DPI for screen dimensions"</span>
<span class="nv">$ </span>irb
irb<span class="o">(</span>main<span class="o">)</span>:001&gt; inches <span class="o">=</span> <span class="o">[</span>59.6 / 2.54, 39.7 / 2.54] <span class="c"># convert cm to in</span>
<span class="o">=&gt;</span> <span class="o">[</span>23.46456692913386, 15.62992125984252]
irb<span class="o">(</span>main<span class="o">)</span>:002&gt; dimensions <span class="o">=</span> <span class="o">[</span>2256, 1504]
<span class="o">=&gt;</span> <span class="o">[</span>2256, 1504]
irb<span class="o">(</span>main<span class="o">)</span>:003&gt; dimensions.zip<span class="o">(</span>inches<span class="o">)</span>.map <span class="o">{</span> |x, y| x / y <span class="o">}</span>
<span class="o">=&gt;</span> <span class="o">[</span>96.14496644295302, 96.22569269521411]
<span class="nv">$ </span><span class="nb">echo</span> <span class="s1">'Xft*dpi: 128'</span> <span class="o">&gt;&gt;</span> <span class="nv">$HOME</span>/.Xresources
<span class="nv">$ </span>xrdb <span class="nt">-merge</span> <span class="nv">$HOME</span>/.Xresources</code></pre></figure></div>

<p>So my system is correctly setting the DPI to 96 but I find it too small, so I
increased it to 128. I saw a recommendation somewhere about using multiples of
96 but setting it to 192 was <em>way</em> too big so I preferred multiples of 32.</p>

<p>I also found a <a href="https://blog.jamiek.it/2015/04/manually-fixing-multiple-screens-with.html">tutorial to change the scale of specific displays</a> when using
multiple monitors which I’ll probably revisit later.</p>

<h3 id="slim">SLiM</h3>

<p>From the package description:</p>

<blockquote>
  <p>SLiM is a lightweight login manager based on GNUstep’s Login.app. It
makes a great replacement for XDM for those who want something that
looks good, but still do not want Gnome or KDE.</p>
</blockquote>

<p>I boot directly to a graphical environment and use SLiM to start <code class="language-plaintext highlighter-rouge">awesome</code> WM
via my user’s <code class="language-plaintext highlighter-rouge">$HOME/.xinitrc</code>. For this, I set the default runlevel to <code class="language-plaintext highlighter-rouge">4</code> in
<code class="language-plaintext highlighter-rouge">/etc/inittab</code>.</p>

<p>I also create the following file:</p>

<div class="augmented-highlight" augmented-ui="tl-clip t-clip-x tr-clip r-clip-y br-clip b-clip-x bl-clip l-clip-y exe">
<figure class="highlight"><pre><code class="language-bash" data-lang="bash">% <span class="nb">cat</span> <span class="o">&lt;&lt;</span><span class="no">EOF</span><span class="sh"> &gt; /etc/rc.d/rc.4.local
#!/bin/bash

# Start SLiM...
if [ -x /usr/bin/slim ]; then
  exec /usr/bin/slim
fi
</span><span class="no">EOF
</span>% <span class="nb">chmod</span> +x /etc/rc.d/rc.4.local</code></pre></figure></div>

<p>And change the <code class="language-plaintext highlighter-rouge">login_cmd</code> line in <code class="language-plaintext highlighter-rouge">/etc/slim.conf</code> to run <code class="language-plaintext highlighter-rouge">$HOME/.xinitrc</code>:</p>

<div class="augmented-highlight" augmented-ui="tl-clip t-clip-x tr-clip r-clip-y br-clip b-clip-x bl-clip l-clip-y exe">
<figure class="highlight"><pre><code class="language-bash" data-lang="bash">% <span class="nb">cat</span> /etc/slim.conf
...
login_cmd           <span class="nb">exec</span> /bin/bash <span class="nt">-login</span> ~/.xinitrc %session
<span class="c"># login_cmd           exec /bin/bash -login /usr/share/slim/Xsession %session</span>
...</code></pre></figure></div>

<h3 id="running-per-user-applications">Running per-user applications</h3>

<p>To run applications after logging in, I run a few programs and then send them
to the background via xinitrc by including this snippet:</p>

<div class="augmented-highlight" augmented-ui="tl-clip t-clip-x tr-clip r-clip-y br-clip b-clip-x bl-clip l-clip-y exe">
<figure class="highlight"><pre><code class="language-bash" data-lang="bash"><span class="c"># $HOME/.xinitrc</span>
...
<span class="o">[</span> <span class="nt">-f</span> <span class="nv">$HOME</span>/.xinit_private <span class="o">]</span> <span class="o">&amp;&amp;</span> sh <span class="s2">"</span><span class="nv">$HOME</span><span class="s2">/.xinit_private"</span>
...</code></pre></figure></div>

<p>And in <code class="language-plaintext highlighter-rouge">$HOME/.xinitrc_private</code> I run some applets, e.g.:</p>

<div class="augmented-highlight" augmented-ui="tl-clip t-clip-x tr-clip r-clip-y br-clip b-clip-x bl-clip l-clip-y exe">
<figure class="highlight"><pre><code class="language-bash" data-lang="bash"><span class="c"># $HOME/.xinitrc_private</span>

nm-applet &amp; <span class="c"># XFCE4 NetworkManager applet loaded to system tray</span></code></pre></figure></div>

<h3 id="file-manager">File Manager</h3>

<p>I’ve been using <a href="https://docs.xfce.org/xfce/thunar/start">Thunar</a> lately. At first I found it too bright compared to
what I’m used to, so I <a href="https://web.archive.org/web/20140913131950/https://bbs.archlinux.org/viewtopic.php?id=98261">duckduckgoed around</a> and discovered you can configure
it via <a href="https://man.archlinux.org/man/community/lxappearance-gtk3/lxappearance.1.en">lxappearance(1)</a> and that there are <a href="https://www.xfce-look.org/">a lot</a>
of themes from the community, I picked <a href="https://www.xfce-look.org/p/1302313">Dark Olympic</a> as I find it compact and
not so dark.</p>

<p>Thunar allows you to add <a href="https://docs.xfce.org/xfce/thunar/custom-actions">custom actions</a> to interact with files (e.g., extract
a zip archive) and I used to do just that, but now I simply install the
<code class="language-plaintext highlighter-rouge">thunar-archive-plugin</code> as they recommend:</p>

<div class="augmented-highlight" augmented-ui="tl-clip t-clip-x tr-clip r-clip-y br-clip b-clip-x bl-clip l-clip-y exe">
<figure class="highlight"><pre><code class="language-sh" data-lang="sh">% myslack <span class="nb">install</span> <span class="nt">-y</span> thunar-archive-plugin</code></pre></figure></div>

<h3 id="default-applications">Default Applications</h3>

<p>I try to use <code class="language-plaintext highlighter-rouge">xdg-open(1)</code> which will try to open a file depending on it’s MIME
type, one can easily override system defaults by using a file in
<code class="language-plaintext highlighter-rouge">$HOME/.local</code>, e.g.:</p>

<div class="augmented-highlight" augmented-ui="tl-clip t-clip-x tr-clip r-clip-y br-clip b-clip-x bl-clip l-clip-y exe">
<figure class="highlight"><pre><code class="language-bash" data-lang="bash"><span class="nv">$ </span><span class="nb">mkdir</span> <span class="nt">-p</span> ~/.local/share/applications
<span class="nv">$ </span><span class="nb">cat</span> <span class="o">&lt;&lt;</span><span class="no">EOF</span><span class="sh"> &gt; ~/.local/share/applications/defaults.list
application/pdf=okular.desktop
EOF</span></code></pre></figure></div>

<p>Just make sure you specify a <code class="language-plaintext highlighter-rouge">.desktop</code> file that exists in
<code class="language-plaintext highlighter-rouge">/usr/share/applications</code>!</p>

<h2 id="acpi">ACPI</h2>

<p>Hotkeys also do <em>not</em> work properly. Some keys work out of the box but others,
like the volume and screen brightness do not. These, of course, are system
(and hardware) dependent. I’ve configured my system to properly handle
brightness by using <code class="language-plaintext highlighter-rouge">acpid(8)</code>, adding <em>actions</em> for each key and updating
<code class="language-plaintext highlighter-rouge">/etc/acpi/acpi_handler.sh</code> to handle the <code class="language-plaintext highlighter-rouge">video/brightnessdown</code> and
<code class="language-plaintext highlighter-rouge">video/brightnessup</code> events:</p>

<div class="augmented-highlight" augmented-ui="tl-clip t-clip-x tr-clip r-clip-y br-clip b-clip-x bl-clip l-clip-y exe">
<figure class="highlight"><pre><code class="language-sh" data-lang="sh"><span class="c"># /etc/acpi/acpi_handler.sh</span>

<span class="k">case</span> <span class="s2">"</span><span class="nv">$1</span><span class="s2">"</span> <span class="k">in</span>
  ...
  video<span class="p">)</span>
    <span class="k">case</span> <span class="s2">"</span><span class="nv">$2</span><span class="s2">"</span> <span class="k">in
      </span>brightnessdown<span class="p">)</span> /etc/acpi/actions/FnF5-brightnessdown.sh
         <span class="p">;;</span>
      brightnessup<span class="p">)</span> /etc/acpi/actions/FnF6-brightnessup.sh
         <span class="p">;;</span>
      <span class="k">*</span><span class="p">)</span> logger <span class="s2">"ACPI action </span><span class="nv">$2</span><span class="s2"> is not defined"</span>
         <span class="p">;;</span>
  ...
<span class="k">esac</span></code></pre></figure></div>

<ul>
  <li><a href="https://github.com/JuanKman94/dotfiles/blob/a3c3027c9a0ca574b2c4fb08ab9c80b4a87b2138/acpi/etc/acpi/actions/FnF5-brightnessdown.sh">FnF6-brightnessdown.sh</a></li>
  <li><a href="https://github.com/JuanKman94/dotfiles/blob/a3c3027c9a0ca574b2c4fb08ab9c80b4a87b2138/acpi/etc/acpi/actions/FnF5-brightnessup.sh">FnF6-brightnessup.sh</a></li>
</ul>

<h2 id="sound">Sound</h2>

<p>I run pulseaudio system-wide. I enable the pulseaudio service and have my
<code class="language-plaintext highlighter-rouge">/etc/asound.conf</code> look like the following:</p>

<div class="augmented-highlight" augmented-ui="tl-clip t-clip-x tr-clip r-clip-y br-clip b-clip-x bl-clip l-clip-y exe">
<figure class="highlight"><pre><code class="language-sh" data-lang="sh">% <span class="nb">cat</span> /etc/asound.conf
pcm.default pulse
ctl.default pulse

pcm.pulse <span class="o">{</span>
	<span class="nb">type </span>pulse
<span class="o">}</span>

ctl.pulse <span class="o">{</span>
	<span class="nb">type </span>pulse
<span class="o">}</span>
% <span class="nb">chmod </span>u+x /etc/rc.d/rc.pulseaudio
% /etc/rc.d/rc.pulseaudio start</code></pre></figure></div>

<h2 id="polkit-policykit-for-privileged-actions">polkit (PolicyKit) for privileged actions</h2>

<p>PolicyKit is used to grant authorization to restricted actions via policies
that can match user ID, group or other contextual variables. Per the package
description:</p>

<blockquote>
  <p>PolicyKit is an application-level toolkit for defining and handling
the policy that allows unprivileged processes to speak to privileged
processes. PolicyKit is specifically targeting applications in rich
desktop environments on multi-user UNIX-like operating systems.</p>
</blockquote>

<h3 id="networkmanager">NetworkManager</h3>

<p>I use <code class="language-plaintext highlighter-rouge">NetworkManager</code> for easier handling when WiFi is disconnected: it’s
much simpler to click stuff than going to a root terminal and running
<code class="language-plaintext highlighter-rouge">/etc/rc.d/.rc.inet1 restart</code>.</p>

<p>I setup my X session (<code class="language-plaintext highlighter-rouge">~/.xinitrc</code>) to run <a href="https://gitlab.gnome.org/GNOME/network-manager-applet">nm-applet</a> which is a tray applet
to interact with NM (NetworkManager). Normally you would get a permission
denied error when trying to disable an interface or (dis)connect to a wifi
network because NM is started by <code class="language-plaintext highlighter-rouge">root</code> and the X session is running as a
different user, so we need a special policy to grant our user authorization
for NM actions.</p>

<p>With the following policy we allow users in the <code class="language-plaintext highlighter-rouge">netdev</code> group to manage NM:</p>

<div class="augmented-highlight" augmented-ui="tl-clip t-clip-x tr-clip r-clip-y br-clip b-clip-x bl-clip l-clip-y exe">
<figure class="highlight"><pre><code class="language-js" data-lang="js"><span class="c1">// /etc/polkit-1/rules.d/10-org.freedesktop.NetworkManager.rules</span>

<span class="nx">polkit</span><span class="p">.</span><span class="nf">addRule</span><span class="p">(</span><span class="kd">function</span><span class="p">(</span><span class="nx">action</span><span class="p">,</span> <span class="nx">subject</span><span class="p">)</span> <span class="p">{</span>
  <span class="k">if </span><span class="p">(</span><span class="nx">action</span><span class="p">.</span><span class="nx">id</span><span class="p">.</span><span class="nf">indexOf</span><span class="p">(</span><span class="dl">"</span><span class="s2">org.freedesktop.NetworkManager.</span><span class="dl">"</span><span class="p">)</span> <span class="o">==</span> <span class="mi">0</span>
    <span class="o">&amp;&amp;</span> <span class="nx">subject</span><span class="p">.</span><span class="nf">isInGroup</span><span class="p">(</span><span class="dl">"</span><span class="s2">netdev</span><span class="dl">"</span><span class="p">)</span>
  <span class="p">)</span> <span class="p">{</span>
    <span class="k">return</span> <span class="nx">polkit</span><span class="p">.</span><span class="nx">Result</span><span class="p">.</span><span class="nx">YES</span><span class="p">;</span>
  <span class="p">}</span>
<span class="p">});</span></code></pre></figure></div>

<p>And with the following command my user (<code class="language-plaintext highlighter-rouge">geckox</code>) is added to the
<code class="language-plaintext highlighter-rouge">netdev</code> group:</p>

<div class="augmented-highlight" augmented-ui="tl-clip t-clip-x tr-clip r-clip-y br-clip b-clip-x bl-clip l-clip-y exe">
<figure class="highlight"><pre><code class="language-sh" data-lang="sh">% usermod <span class="nt">-a</span> <span class="nt">-G</span> netdev geckox</code></pre></figure></div>

<p>I assume this policy would also allow to control NM via the CLI command
(<code class="language-plaintext highlighter-rouge">nmcli</code>) and the terminal UI (<code class="language-plaintext highlighter-rouge">nmtui</code>).</p>

<p>Thanks to <em>atelszewski</em> for the LinuxQuestions
<a href="https://www.linuxquestions.org/questions/slackware-14/slackware-14-2-networkmanager-won%27t-configure-network-until-restarted-4175625716/#post5832056">post</a>!</p>

<h3 id="suspension">Suspension</h3>

<p>Suspension is acomplished via <a href="https://alien.slackbook.org/blog/replacing-consolekit2-with-elogind-first-steps/">elogind</a>. For this to work, I added my user to the “power” group
and added a polkit rule for power management:</p>

<div class="augmented-highlight" augmented-ui="tl-clip t-clip-x tr-clip r-clip-y br-clip b-clip-x bl-clip l-clip-y exe">
<figure class="highlight"><pre><code class="language-sh" data-lang="sh">% usermod <span class="nt">-a</span> <span class="nt">-G</span> power geckox

% <span class="nb">cat</span> /etc/polkit-1/rules.d/10-enable-session-power.rules
polkit.addRule<span class="o">(</span>
  <span class="k">function</span><span class="o">(</span>action, subject<span class="o">)</span> <span class="o">{</span>
    <span class="k">if</span> <span class="o">(</span>
      <span class="o">(</span>action.id <span class="o">==</span> <span class="s2">"org.freedesktop.login1.reboot"</span> <span class="o">||</span>
       action.id <span class="o">==</span> <span class="s2">"org.freedesktop.login1.power-off"</span> <span class="o">||</span>
       ...
       action.id <span class="o">==</span> <span class="s2">"org.freedesktop.login1.suspend"</span>
      <span class="o">)</span>
      <span class="o">&amp;&amp;</span> subject.isInGroup<span class="o">(</span><span class="s2">"power"</span><span class="o">)</span>
    <span class="o">)</span> <span class="o">{</span>
      <span class="k">return </span>polkit.Result.YES<span class="p">;</span>
    <span class="o">}</span>
  <span class="o">}</span>
<span class="o">)</span></code></pre></figure></div>]]></content><author><name>juankman94</name></author><category term="slackware" /><category term="linux" /><category term="thinkpad" /><category term="laptop" /><summary type="html"><![CDATA[My (rough &amp; rowdy) experience using Slackware on a Thinkpad A485.]]></summary><media:thumbnail xmlns:media="http://search.yahoo.com/mrss/" url="https://www.geckox.mx/slackware.png" /><media:content medium="image" url="https://www.geckox.mx/slackware.png" xmlns:media="http://search.yahoo.com/mrss/" /></entry><entry><title type="html">RSpec request spec fails when running in group/file/suite</title><link href="https://www.geckox.mx/2023/07/20/rspec-request-spec-fails-group-file-suite.html" rel="alternate" type="text/html" title="RSpec request spec fails when running in group/file/suite" /><published>2023-07-20T07:08:00+00:00</published><updated>2023-07-20T07:08:00+00:00</updated><id>https://www.geckox.mx/2023/07/20/rspec-request-spec-fails-group-file-suite</id><content type="html" xml:base="https://www.geckox.mx/2023/07/20/rspec-request-spec-fails-group-file-suite.html"><![CDATA[<p>But the request spec does <strong>NOT</strong> fail when an individual test is run.</p>

<h3 id="tldr">TL;DR</h3>

<p>Remove <code class="language-plaintext highlighter-rouge">config.include RSPec::Rails::ViewRendering</code> from your rspec configuration.</p>

<hr />

<figure class="ml-6 right">
  <img src="
/assets/images/necessary-evil.jpg
" alt="The Dark Knight Rises meme representing Google as a necessary evil." loading="lazy" />

  <figcaption>Google still has a big knowledge base that other search engines don't.</figcaption>

</figure>

<p>Lately I’ve been working on a <strong>ruby</strong> codebase that runs since <em>at least</em> 2009,
which entitles it to the term legacy.</p>

<p>Needless to say, this application was developed <em>as Ruby on Rails was developed</em> so a lot of the
RoR framework stuff is implemented in-house since it was used before Rails added first-party
support (e.g., <code class="language-plaintext highlighter-rouge">enum</code> model attributes). To make my life easier as I get with the day-to-day
stuff I follow a <abbr title="Test Driven Development">TDD</abbr> workflow because:</p>

<ol>
  <li>I don’t know the whole codebase</li>
  <li>I don’t wanna know the whole codebase</li>
  <li>I don’t wanna understand the codebase via production errors</li>
</ol>

<p>This application, thank the developers before me, has an extensive test suite which includes unit
tests (model &amp; business logic tests) and integration tests (<a href="https://www.selenium.dev/">selenium</a>/<a href="https://cucumber.io/">cucumber</a>) but,
as fortune would have it, I’m temporarily a <em>solo</em> developer and, as I’m not proficient using
Selenium (and it <strong>really</strong> slows down CI runtime), I try to stick to <a href="https://rspec.info/">rspec</a>.</p>

<p>Anyway, I had to update an existing data flow to consider an additional parameter that would create
an extra database record as a result <em>under arbitrary conditions</em> so, naturally, I looked for the
existing tests and found out there were only a subset of tests written on cucumber.</p>

<p>I wrote me a request spec to test in-between classes and save me some time and, <em>lo and behold</em>,
my <strong>tests passed when run individually</strong> but failed when the whole spec/file was run.</p>

<p>After a couple of days <abbr title="as in, using DuckDuckGo">ducking around</abbr> and finding no
answer, I turned to Google for Rails 5 now-sunken knowledge and found this <a href="https://stackoverflow.com/questions/44799108/request-specs-missing-template-error-only-when-ran-in-a-group-file-or-suite">StackOverflow entry</a>
detailing my situation which, thank the gods, unblocked me with a single line code change after
3 days of scratching my head with frustration.</p>

<p>The error itself was:</p>

<div class="augmented-highlight" augmented-ui="tl-clip t-clip-x tr-clip r-clip-y br-clip b-clip-x bl-clip l-clip-y exe">
<figure class="highlight"><pre><code class="language-text" data-lang="text">ActionController::UnknownFormat:
  MyController#show is missing a template for this request format and variant.

  request.formats: ["text/html"]
  request.variant: []</code></pre></figure></div>

<p>And the app had this in its rspec configuration:</p>

<div class="augmented-highlight" augmented-ui="tl-clip t-clip-x tr-clip r-clip-y br-clip b-clip-x bl-clip l-clip-y exe">
<figure class="highlight"><pre><code class="language-ruby" data-lang="ruby"><span class="c1"># spec/rails_helper.rb</span>
<span class="no">RSpec</span><span class="p">.</span><span class="nf">configure</span> <span class="k">do</span> <span class="o">|</span><span class="n">config</span><span class="o">|</span>
  <span class="o">...</span>

  <span class="n">config</span><span class="p">.</span><span class="nf">include</span> <span class="no">RSPec</span><span class="o">::</span><span class="no">Rails</span><span class="o">::</span><span class="no">ViewRendering</span>
<span class="k">end</span></code></pre></figure></div>

<p>After removing this view rendering configuration mixin, my <code class="language-plaintext highlighter-rouge">request</code> specs passed when running
with the whole suite and not just when running individually.</p>

<h2 id="conclusion">Conclusion</h2>

<ul>
  <li>ChatGPT is <strong>NOT</strong> ready to solve my day-to-day problems
(please generate documentation for my codebase!)</li>
  <li>Sadly, DuckDuckGo hasn’t phased out <del>AdStore</del> Google</li>
  <li>Big ol’ G is still a necessary evil</li>
</ul>]]></content><author><name>juankman94</name></author><category term="ruby" /><category term="rspec" /><summary type="html"><![CDATA[But the request spec does NOT fail when an individual test is run.]]></summary><media:thumbnail xmlns:media="http://search.yahoo.com/mrss/" url="https://www.geckox.mx/necessary-evil.jpg" /><media:content medium="image" url="https://www.geckox.mx/necessary-evil.jpg" xmlns:media="http://search.yahoo.com/mrss/" /></entry><entry><title type="html">TIL: Attach binary file to Active Storage record</title><link href="https://www.geckox.mx/2022/12/19/til-attach-active-storage-from-binary.html" rel="alternate" type="text/html" title="TIL: Attach binary file to Active Storage record" /><published>2022-12-19T17:37:00+00:00</published><updated>2022-12-19T17:37:00+00:00</updated><id>https://www.geckox.mx/2022/12/19/til-attach-active-storage-from-binary</id><content type="html" xml:base="https://www.geckox.mx/2022/12/19/til-attach-active-storage-from-binary.html"><![CDATA[<p>The <a href="https://api.rubyonrails.org/classes/ActiveStorage/Attached/One.html#method-i-attach">#attach</a> method can be tricky to work with when the file doesn’t come from a browser, so after
struggling a bit with it, I’m writing this down!</p>

<figure>
  <img src="
/assets/images/clip_attachment.jpg
" alt="Peculiar image of a paper clip attaching a woman to a door." loading="lazy" />

</figure>

<div class="augmented-highlight" augmented-ui="tl-clip t-clip-x tr-clip r-clip-y br-clip b-clip-x bl-clip l-clip-y exe">
<figure class="highlight"><pre><code class="language-ruby" data-lang="ruby"><span class="k">class</span> <span class="nc">MyModel</span> <span class="o">&lt;</span> <span class="no">ApplicationRecord</span>
  <span class="n">has_one_attached</span> <span class="ss">:file</span>
<span class="k">end</span>

<span class="k">class</span> <span class="nc">DownloadRemoteImageJob</span>
  <span class="k">def</span> <span class="nf">perform</span><span class="p">(</span><span class="n">my_model</span><span class="p">)</span>
    <span class="o">...</span>
    <span class="n">response</span> <span class="o">=</span> <span class="n">http_conn</span><span class="p">.</span><span class="nf">get</span><span class="p">(</span><span class="n">my_model</span><span class="p">.</span><span class="nf">url</span><span class="p">)</span> <span class="c1"># remote file</span>
    <span class="n">pathname</span> <span class="o">=</span> <span class="no">Pathname</span><span class="p">.</span><span class="nf">new</span><span class="p">(</span><span class="n">my_model</span><span class="p">.</span><span class="nf">url</span><span class="p">)</span>
    <span class="n">mime</span> <span class="o">=</span> <span class="no">Rack</span><span class="o">::</span><span class="no">Mime</span><span class="p">.</span><span class="nf">mime_type</span><span class="p">(</span><span class="n">pathname</span><span class="p">.</span><span class="nf">extname</span><span class="p">)</span> <span class="c1"># this is a poor way of getting the mime-type</span>

    <span class="c1"># store response in tempfile</span>
    <span class="n">tmpfile</span> <span class="o">=</span> <span class="no">Tempfile</span><span class="p">.</span><span class="nf">new</span><span class="p">(</span><span class="n">pathname</span><span class="p">.</span><span class="nf">basename</span><span class="p">.</span><span class="nf">to_s</span><span class="p">)</span>
    <span class="n">tmpfile</span><span class="p">.</span><span class="nf">binmode</span>
    <span class="n">tmpfile</span><span class="p">.</span><span class="nf">write</span><span class="p">(</span><span class="n">response</span><span class="p">.</span><span class="nf">body</span><span class="p">)</span>
    <span class="n">tmpfile</span><span class="p">.</span><span class="nf">rewind</span>

    <span class="n">my_model</span><span class="p">.</span><span class="nf">file</span><span class="p">.</span><span class="nf">attach</span><span class="p">(</span>
      <span class="ss">io: </span><span class="n">tmpfile</span><span class="p">,</span>
      <span class="ss">filename: </span><span class="n">pathname</span><span class="p">.</span><span class="nf">basename</span><span class="p">.</span><span class="nf">to_s</span><span class="p">,</span>
      <span class="ss">content_type: </span><span class="n">mime</span>
    <span class="p">)</span>
    <span class="n">my_model</span><span class="p">.</span><span class="nf">save!</span>
  <span class="k">ensure</span>
    <span class="n">tmpfile</span><span class="p">.</span><span class="nf">close!</span> <span class="k">if</span> <span class="k">defined?</span><span class="p">(</span><span class="n">tmpfile</span><span class="p">)</span>
  <span class="k">end</span>
<span class="k">end</span></code></pre></figure></div>

<h2 id="credits">Credits</h2>

<ul>
  <li class="attribution">"<a target="_blank" rel="noopener noreferrer" href="https://commons.wikimedia.org/w/index.php?curid=26464275">File:'Attached to the Village' by Javad Alizadeh.jpg</a>" by Javad Alizadeh is licensed under <a target="_blank" rel="noopener noreferrer" href="https://creativecommons.org/licenses/by-sa/3.0/?ref=openverse">CC BY-SA 3.0 <img src="https://mirrors.creativecommons.org/presskit/icons/cc.svg" class="cc-img" /><img src="https://mirrors.creativecommons.org/presskit/icons/by.svg" class="cc-img" /><img src="https://mirrors.creativecommons.org/presskit/icons/sa.svg" class="cc-img" /></a>.</li>
  <li class="attribution">This <a href="https://github.com/rails/rails/issues/32711">closed issue (rails/32711)</a> from a couple of years ago.</li>
</ul>]]></content><author><name>juankman94</name></author><category term="rails" /><category term="activestorage" /><summary type="html"><![CDATA[The #attach method can be tricky to work with when the file doesn’t come from a browser, so after struggling a bit with it, I’m writing this down!]]></summary><media:thumbnail xmlns:media="http://search.yahoo.com/mrss/" url="https://www.geckox.mx/clip_attachment.jpg" /><media:content medium="image" url="https://www.geckox.mx/clip_attachment.jpg" xmlns:media="http://search.yahoo.com/mrss/" /></entry><entry><title type="html">How To: Rails + Apache (httpd) + ActionCable WebSockets</title><link href="https://www.geckox.mx/2022/12/15/how-to-rails-apache-httpd-actioncable-websockets.html" rel="alternate" type="text/html" title="How To: Rails + Apache (httpd) + ActionCable WebSockets" /><published>2022-12-15T20:05:00+00:00</published><updated>2022-12-15T20:05:00+00:00</updated><id>https://www.geckox.mx/2022/12/15/how-to-rails-apache-httpd-actioncable-websockets</id><content type="html" xml:base="https://www.geckox.mx/2022/12/15/how-to-rails-apache-httpd-actioncable-websockets.html"><![CDATA[<p>After reading <a href="https://deploymentfromscratch.com/">Deployment From Scratch</a> by <a href="https://strzibny.name/">Josef Strzibny</a> and moving a small Rails
application off of heroku with this new knowledge, I eventually ran into the first wall of not
having a plugin work out-of-the-box a la heroku way when I implemented a small Turbo Stream
feature (obligatory Hotwired-is-awesome plug).</p>

<figure>
  <img src="
/assets/images/apache_rails.jpg
" alt="Meme representing Apache HTTPD and Rails working together via reverse proxy." loading="lazy" />

  <figcaption>Old technology needs love &amp; maintenance lest we lose it.</figcaption>

</figure>

<p>A few reasons made this difficult to figure out:</p>

<ol>
  <li>Everyone uses Nginx</li>
  <li>The <abbr title="Deployment From Scratch">DFS</abbr> book covers Nginx but I managed to get an
Apache VHost to mimic <em>most</em> of the configuration</li>
  <li>My Rails app is running as a service, albeit managed and proxied to via a Unix socket,
not the common HTTP reverse proxy configuration, i.e., HTTP servers communicating
via TCP sockets</li>
  <li>I couldn’t find anything online for the WebSocket connection upgrade when reverse proxying to
a Unix socket! I’m sure I’m not the only one who’s done it but <a href="https://duckduckgo.com">DuckDuckGo</a> didn’t get me anywhere
(not to mention <del>AdSearch</del> G00gle)</li>
</ol>

<p>There are
<a href="https://www.serverlab.ca/tutorials/linux/web-servers-linux/how-to-reverse-proxy-websockets-with-apache-2-4/">several</a>
<a href="https://techglimpse.com/configure-apache-for-websockets-using-reverse-proxy/">posts</a>
<a href="https://stackoverflow.com/questions/53939609/apache-websocket-connectionupgrade-replaced-by-keep-alive">about</a>
setting up a reverse proxy and then adding a <a href="https://httpd.apache.org/docs/2.4/mod/mod_rewrite.html#rewritecond">RewriteRule</a> to
<a href="https://httpd.apache.org/docs/2.4/mod/mod_proxy_wstunnel.html">change the URL’s</a>
scheme to <code class="language-plaintext highlighter-rouge">ws</code> instead of <code class="language-plaintext highlighter-rouge">http</code> because Apache will override the request’s <code class="language-plaintext highlighter-rouge">Connection</code> header
and simply <strong>not pass</strong> the <code class="language-plaintext highlighter-rouge">Upgrade</code> header to the origin server.</p>

<p>So, without further ado:</p>

<h2 id="apache-vhost-configuration">Apache VHost Configuration</h2>

<div class="augmented-highlight" augmented-ui="tl-clip t-clip-x tr-clip r-clip-y br-clip b-clip-x bl-clip l-clip-y exe">
<figure class="highlight"><pre><code class="language-apache" data-lang="apache"><span class="c"># websocket_app.conf</span>

<span class="p">&lt;</span><span class="nl">VirtualHost</span><span class="sr"> *:443</span><span class="p">&gt;
</span>  <span class="nc">ServerAdmin</span> admin@websocket-app.com
  <span class="nc">ServerName</span> websocket-app.com
  <span class="nc">DocumentRoot</span> /srv/websocket_app/rails/app/public
  <span class="nc">ProxyRequests</span> <span class="ss">off</span>

  <span class="p">&lt;</span><span class="nl">Directory</span><span class="sr"> /srv/websocket_app/rails/app/public</span><span class="p">&gt;
</span>    <span class="nc">AllowOverride</span> <span class="ss">all</span>
    <span class="nc">Require</span> <span class="ss">all</span> granted
  <span class="p">&lt;/</span><span class="nl">Directory</span><span class="p">&gt;
</span>
  <span class="p">&lt;</span><span class="nl">Location</span><span class="sr"> /</span><span class="p">&gt;
</span>    <span class="nc">ProxyPass</span> unix:/srv/websocket_app/rails/app/tmp/puma.sock|http://%{HTTP_HOST}/
    <span class="nc">ProxyPassReverse</span> unix:/srv/websocket_app/rails/app/tmp/puma.sock|http://%{HTTP_HOST}/
    <span class="nc">ProxyPassReverseCookieDomain</span> "websocket-app.com" "websocket-app.com"
    <span class="nc">ProxyPassReverseCookiePath</span>  "/"  "/"
    <span class="nc">RequestHeader</span> <span class="ss">set</span> X-Forwarded-Proto expr=%{REQUEST_SCHEME}
    <span class="nc">RequestHeader</span> <span class="ss">set</span> X-Forwarded-SSL expr=%{HTTPS}
  <span class="p">&lt;/</span><span class="nl">Location</span><span class="p">&gt;
</span>
  <span class="c"># URL where ActionCable is mounted</span>
  <span class="p">&lt;</span><span class="nl">Location</span><span class="sr"> /cable</span><span class="p">&gt;
</span>    <span class="nc">ProxyPass</span> unix:/srv/websocket_app/rails/app/tmp/puma.sock|ws://%{HTTP_HOST}/cable <span class="c"># `/cable` at the end here is important</span>
    <span class="nc">ProxyPassReverse</span> unix:/srv/websocket_app/rails/app/tmp/puma.sock|ws://%{HTTP_HOST}/cable
    <span class="nc">ProxyPassReverseCookieDomain</span> "websocket-app.com" "websocket-app.com"
    <span class="nc">ProxyPassReverseCookiePath</span>  "/"  "/"
    <span class="nc">RequestHeader</span> <span class="ss">set</span> X-Forwarded-Proto expr=%{REQUEST_SCHEME}
    <span class="nc">RequestHeader</span> <span class="ss">set</span> X-Forwarded-SSL expr=%{HTTPS}
  <span class="p">&lt;/</span><span class="nl">Location</span><span class="p">&gt;
&lt;/</span><span class="nl">VirtualHost</span><span class="p">&gt;</span></code></pre></figure></div>

<p>Basically, it boils down to adding a specific proxy to the URL where ActionCable is mounted,
<code class="language-plaintext highlighter-rouge">/cable</code> by default, and instead of using a <code class="language-plaintext highlighter-rouge">RewriteRule</code> we reverse proxy using
<abbr title="WebSocket">ws</abbr> protocol instead of <code class="language-plaintext highlighter-rouge">http</code>.</p>]]></content><author><name>juankman94</name></author><category term="rails" /><category term="ruby-on-rails" /><category term="apache" /><category term="httpd" /><category term="action-cable" /><category term="websockets" /><category term="web-sockets" /><summary type="html"><![CDATA[TL;DR: add a reverse proxy specifically for the connection upgrade URL.]]></summary><media:thumbnail xmlns:media="http://search.yahoo.com/mrss/" url="https://www.geckox.mx/apache_rails.jpg" /><media:content medium="image" url="https://www.geckox.mx/apache_rails.jpg" xmlns:media="http://search.yahoo.com/mrss/" /></entry><entry><title type="html">Grow ext2/ext3/ext4 Partition Size</title><link href="https://www.geckox.mx/2022/04/13/grow-ext2-ext3-ext4-partition-size.html" rel="alternate" type="text/html" title="Grow ext2/ext3/ext4 Partition Size" /><published>2022-04-13T01:21:00+00:00</published><updated>2022-04-13T01:21:00+00:00</updated><id>https://www.geckox.mx/2022/04/13/grow-ext2-ext3-ext4-partition-size</id><content type="html" xml:base="https://www.geckox.mx/2022/04/13/grow-ext2-ext3-ext4-partition-size.html"><![CDATA[<p>After a couple of months of using a raspberry as a home server with <a href="/2021/09/26/slackware-rpi.html">MiniDLNA as a media server</a>
and a <a href="/2021/10/14/transmission-bittorrent-daemon-on-a-raspberry-pi.html">headless Transmission daemon as bittorrent client</a> that works 24/7 downloading any kind of
media I want, it surprises me that I managed to <strong>not</strong> fill the storage as quick as I could have.</p>

<figure>
  <img src="
/assets/images/grow_partition.png
" alt="Adding a red mushroom to SSD increases it's size" loading="lazy" />

</figure>

<p>And now it pays off that I picked ext2 (I don’t need extensive logging nor datacenter capabilities)
as my file system format, since cloning and growing the partition is a pretty straightforward
operation. What needs to be done is basically:</p>

<h2 id="tldr">TL;DR</h2>

<ol>
  <li>Copy/clone the old disk to the new disk</li>
  <li>Run <a href="https://linux.die.net/man/8/e2fsck">e2fsck(8)</a> on the ext2/ext3/ext4 partition in the new disk (use the <code class="language-plaintext highlighter-rouge">-f</code> option to be safe)</li>
  <li>Rewrite/modify the partition table in the new disk; can be done with <a href="https://linux.die.net/man/8/fdisk">fdisk(8)</a>.
<strong>DANGER</strong>: you need to pay close attention to the “Start block”, because the ext2 metadata is
located there. If you overwrite it or start somewhere else, the files location will be lost
and your data might be <strong>lost forever</strong>.</li>
  <li>Run <a href="https://linux.die.net/man/8/resize2fs">resize2fs(8)</a> on the ext2/ext3/ext4 partition in the new disk</li>
</ol>

<h2 id="copyclone-the-disk">Copy/Clone the Disk</h2>

<p>This is done very easily with <a href="https://linux.die.net/man/1/dd">dd(1)</a>, we just specify the input file the old disk (<code class="language-plaintext highlighter-rouge">/dev/sdb</code>) and
the new one (<code class="language-plaintext highlighter-rouge">/dev/sdc</code>) as output file, I also pass the block size parameter to speed up the
process:</p>

<div class="augmented-highlight" augmented-ui="tl-clip t-clip-x tr-clip r-clip-y br-clip b-clip-x bl-clip l-clip-y exe">
<figure class="highlight"><pre><code class="language-sh" data-lang="sh"><span class="c"># dd if=/dev/sdb of=/dev/sdc bs=4K</span></code></pre></figure></div>

<p>The command doesn’t print anything when things are going well, but you can print the progress <em>to
the tty executing dd</em> by sending the <code class="language-plaintext highlighter-rouge">USR1</code> signal to the process (see <a href="https://linux.die.net/man/1/dd">dd(1)</a>):</p>

<div class="augmented-highlight" augmented-ui="tl-clip t-clip-x tr-clip r-clip-y br-clip b-clip-x bl-clip l-clip-y exe">
<figure class="highlight"><pre><code class="language-sh" data-lang="sh"><span class="c"># kill -s USR1 $(pidof dd)</span></code></pre></figure></div>

<h2 id="run-fdisk-on-the-new-disk">Run fdisk on the New Disk</h2>

<p>Most linux distributions include an interactive implementation of <a href="https://linux.die.net/man/8/fdisk">fdisk(8)</a> which is what I used
and cannot write about the scriptable implementation. What you want to do is:</p>

<div class="augmented-highlight" augmented-ui="tl-clip t-clip-x tr-clip r-clip-y br-clip b-clip-x bl-clip l-clip-y exe">
<figure class="highlight"><pre><code class="language-sh" data-lang="sh"><span class="c"># fdisk /dev/sdc</span>

Welcome to fdisk <span class="o">(</span>util-linux 2.37.2<span class="o">)</span><span class="nb">.</span>
Changes will remain <span class="k">in </span>memory only, <span class="k">until </span>you decide to write them.
Be careful before using the write command.


Command <span class="o">(</span>m <span class="k">for </span><span class="nb">help</span><span class="o">)</span>: p

Disk /dev/sda: 223.57 GiB, 240057409536 bytes, 468862128 sectors
Disk model: ADATA SU630
Units: sectors of 1 <span class="k">*</span> 512 <span class="o">=</span> 512 bytes
Sector size <span class="o">(</span>logical/physical<span class="o">)</span>: 512 bytes / 512 bytes
I/O size <span class="o">(</span>minimum/optimal<span class="o">)</span>: 512 bytes / 512 bytes
Disklabel <span class="nb">type</span>: dos
Disk identifier: 0xbe4e4347

Device     Boot   Start       End   Sectors   Size Id Type
/dev/sda1          2048   2099199   2097152   111G 83 Linux

Command <span class="o">(</span>m <span class="k">for </span><span class="nb">help</span><span class="o">)</span>:</code></pre></figure></div>

<ol>
  <li>Print the existing partition table by issuing the <code class="language-plaintext highlighter-rouge">p</code> (print) command and check the start block</li>
  <li><strong>Delete</strong> the existing partition (<strong>DO NOT WRITE CHANGES YET</strong>)</li>
  <li>Create a new partition with the new desired size. Make sure you use the same “Start block”
used by the old/existing partition (now deleted) and the same type</li>
  <li><strong>Write</strong> the new configuration to disk (this is what <em>could</em> destroy your data)</li>
</ol>

<h2 id="run-e2fsck-on-the-ext2ext3ext4-partition">Run e2fsck on the Ext2/Ext3/Ext4 Partition</h2>

<p>This is to check data integrity and, I think, to re-order files to continuous blocks for better
performance. Let’s assume my <em>new</em> partitition is located on <code class="language-plaintext highlighter-rouge">/dev/sdc1</code>:</p>

<div class="augmented-highlight" augmented-ui="tl-clip t-clip-x tr-clip r-clip-y br-clip b-clip-x bl-clip l-clip-y exe">
<figure class="highlight"><pre><code class="language-sh" data-lang="sh"><span class="c"># e2fsck -f /dev/sdc1</span></code></pre></figure></div>

<h2 id="run-resize2fs-on-the-ext2ext3ext4-partition">Run resize2fs on the Ext2/Ext3/Ext4 Partition</h2>

<p>This is the command that will actually grow the file system size to match the partition size, which
we increased with <code class="language-plaintext highlighter-rouge">fdisk</code> previously:</p>

<div class="augmented-highlight" augmented-ui="tl-clip t-clip-x tr-clip r-clip-y br-clip b-clip-x bl-clip l-clip-y exe">
<figure class="highlight"><pre><code class="language-sh" data-lang="sh"><span class="c"># resize2fs /dev/sdc1</span></code></pre></figure></div>

<p><strong>And that’s it!</strong> You can <code class="language-plaintext highlighter-rouge">mount</code> the partition and check the file system size with <code class="language-plaintext highlighter-rouge">df</code> to verify
it worked. If the size is not updated, you may have not run <code class="language-plaintext highlighter-rouge">e2fsck</code> before <code class="language-plaintext highlighter-rouge">resize2fs</code>.</p>]]></content><author><name>juankman94</name></author><category term="ext2" /><category term="ext3" /><category term="ext4" /><category term="grow" /><category term="increase" /><category term="partition" /><summary type="html"><![CDATA[After a couple of months of using a raspberry as a home server with MiniDLNA as a media server and a headless Transmission daemon as bittorrent client that works 24/7 downloading any kind of media I want, it surprises me that I managed to not fill the storage as quick as I could have.]]></summary><media:thumbnail xmlns:media="http://search.yahoo.com/mrss/" url="https://www.geckox.mx/grow_partition.png" /><media:content medium="image" url="https://www.geckox.mx/grow_partition.png" xmlns:media="http://search.yahoo.com/mrss/" /></entry></feed>