Running Slackware on a Thinkpad A485
My (rough & rowdy) experience using Slackware on a Thinkpad A485.
Update 2024-10-01: I got a Framework Laptop 13 because the Thinkpad’s display quality was jarring after interchanged use with macbook laptops. A lot of the steps detailed here have been revisited for slackware64-current unless noted otherwise.
This isn’t as straightforward compared to other distros, but once you’re
familiar with the process it isn’t too complicated. First of all you need to
get an ISO for the version you want to install. If you go to the Get Slack
page you’re told to download from one of the mirrors, i.e.,
https://mirrors.slackware.com/. After a few
more clicks you end up in the official mirror’s
directory for slackware ISOs.
I’m gonna use slackware64-15.0-iso.
Making the Bootable USB
These ISOs are intended to be used for DVD installation, which isn’t very common as of this writing. After you download the ISO you can mount it in your computer to get the USB installation image by reading the usb-and-pxe-installers/README_USB.txt file. I’m gonna summarize what I do:
- Mount the ISO, i.e.:
$ mount $HOME/downloads/slackware-15.0-install-dvd.iso /mnt/dvd - Burn the bootable image to an USB drive, i.e.:
$ dd if=/mnt/dvd/usb-and-pxe-installers/usbboot.img of=/dev/sdb bs=1M status=progress - Burn the ISO itself to another USB drive, i.e.:
$ dd if=$HOME/downloads/slackware-15.0-install-dvd.iso of=/dev/sdc bs=1M status=progress
My bootable USB couldn’t load the kernel properly (not enough memory to load initrd), so I had to pass some parameters to the boot line:
boot: huge.s noapic mem=2048MInstallation
The idea is to mount the second USB in a directory before running
setup and then entering that directory path when asked:
% mkdir /usb
% mount /dev/sdc1 /usb
% ls /usb/slackware64
CHECKSUMS.md5 CHECKSUMS.md5.asc FILE_LIST MANIFEST.bz2 PACKAGES.TXT
a/ ap/ d/ e/ f/ k/ kde/ l/ n/ t/ tcl/ x/ xap/ xfce/ y/
When asked for the SOURCE pre-mounted directory, you should input
/usb/slackware64.
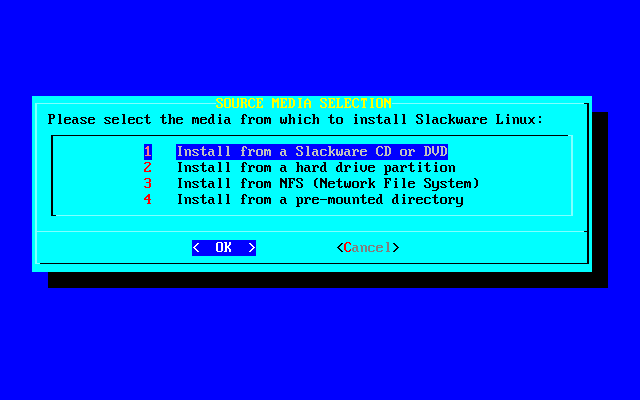
After booting the installation USB (UEFI, legacy BIOS or whatever) and following the partitioning instructions (read the Slackware-HOWTO file at least twice), you will run the setup program.
After selecting your TARGET partition table, you need to specify a SOURCE
for the programs you want in your system, which is where the second USB comes
to play.
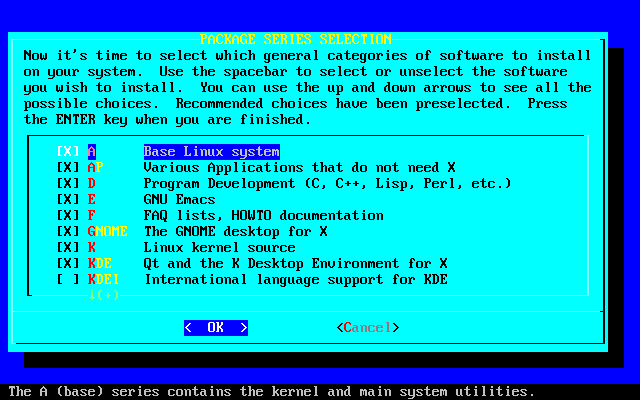
NOTE: if you don’t see all the series options in the SELECT step, the
pre-mounted directory wasn’t configured correctly.
Kernel Parameters
After the setup program completes installing the software series, you might want to generate an initrd (read the README.initrd file).
For this hardware I also needed to append some parameters to the kernel on
boot via lilo.conf(5), after all is said and done, my append line looks
like this:
append = "noapic resume=/dev/slax/swap acpi_osi=Linux acpi_backlight=vendor i8042.direct i8042.dumbkbd "noapicis set so the kernel can detect the hardware properlyresume=/dev/slax/swapwhere to look for an image after suspensionacpi_osi=Linux acpi_backlight=vendorare set so the kernel can change the display’s brightnessi8042.direct i8042.dumbkbdA485’s keyboard [hardware] interface is messed up, this helps. You also need to update your BIOS because the keyboard will send your key presses to the kernel out of order — I don’t know why the hardware behaves this way, but it does
Slackware 14.2 and older
For starters, the slackware 14.2 ISO uses linux kernel 4.4.16 (?), which does NOT support the wireless card, so you need to upgrade the kernel using an ethernet connection.
And after that, you need to install the wireless card drivers separately, since they’re not in the linux tree yet. Fortunately, lwfinger uploaded the driver code to github: lwfinger/rtlwifi_new. Which seems to be down as of this writing but if you contact me I can send you the code. The README explains it all: minimum kernel version requirement, you need to rebuild the driver whenever you change kernel version, etc.
X
The default sensitivity for the touchpad is way too high, i.e., it’s very sensitive. Whenever I’m typing something if something as thin as a hair touches (okay, maybe not so thin) the touchpad, it will move the cursor AND click on stuff. Annoying things happen, like pasting of clipboard’s content, random text selection, input focus loss, etc.
Browsing around I stumbled upon a Linux Mint forum thread, which in turn
points to synaptics(4) where you can read the driver’s configuration options.
Someone pointed out that you the Synaptics Finger option affects touchpad
sensitivity (someone else says the “Hysteresis” options help, I think those are
tweaked via de Noise Cancellation option)
As per the man page, Synaptics Finger takes three 32-bit values, from reading
between lines I gather that those values represent:
FingerLow: when pressure goes below this value, count as release.FingerHigh: when pressure goes above this value, count as touch.Pressure Motion: read the man page, it’s a bit nuanced (or it may be something else¯\_(ツ)_/¯).
As a rule, FingerLow MUST be lower than FingerHigh (duh).
% echo "Check your hardware and it's id"
% xinput --list
...
>   * SynPS/2 Synaptics TouchPad                id=12   [slave  pointer  (2)]
>   * TPPS/2 IBM TrackPoint                     id=13   [slave  pointer  (2)]
...
% echo "So we know that the touchpad is using synaptics and it's id is 12"
% xinput --list-props 12 | less
Device 'SynPS/2 Synaptics TouchPad':
        Device Enabled (134):   1
...
        Synaptics Finger (267): 24, 36, 48
...
% echo "The idea is to play around with these values, so play"
% xinput --set-prop 12 267 42 48 192
```
Honestly, I’m still not sure how the third value affects the touchpad’s behaviour, so I still tweak these values from time to time.
Screen Brightness
A feature I love from phones is that automatic screen color temperature on the environment or time of day. Something similar can be achieved for X11 using the sct (screen color temperature) utility; can be done manually or via a cron job.
I use the following ruby script:
#!/usr/bin/env ruby
# Change screen color temperature (sct(1)) automatically depending
# on current time of day.
#
# Meant to be invoked by crontab(1), e.g.: `0 * * * * /path/to/ruby-script`
#
# @see https://crontab.guru/ Sensical cron schedule editor

COLD_TEMPERATURE = 6500
WARM_TEMPERATURE = 5000

require 'time'

now = Time.now
temperature = COLD_TEMPERATURE
temperature = WARM_TEMPERATURE if now.hour < 8 || now.hour >= 18

exec("sct #{temperature}")
Window Manager
awesomewm via slackbuilds.
Screen Resolution
The framework laptop has a big display. The biggest I’ve ever used on a laptop, so as great as the resolution is, I can’t see shit. Since I’m not using XFCE or KDE which have controls to adjust the rendering scale, I had to figure out how to increase the size of text for the whole system. Naturally, this is configured via the X server.
I found a great tutorial to do just that. These are the steps I did while following the instructions:
$ xdpyinfo | grep -B2 resolution
screen #0:
  dimensions:    2256x1504 pixels (596x397 millimeters)
  resolution:    96x96 dots per inch
$ echo "Calculating ideal DPI for screen dimensions"
$ irb
irb(main):001> inches = [59.6 / 2.54, 39.7 / 2.54] # convert cm to in
=> [23.46456692913386, 15.62992125984252]
irb(main):002> dimensions = [2256, 1504]
=> [2256, 1504]
irb(main):003> dimensions.zip(inches).map { |x, y| x / y }
=> [96.14496644295302, 96.22569269521411]
$ echo 'Xft*dpi: 128' >> $HOME/.Xresources
$ xrdb -merge $HOME/.Xresources
So my system is correctly setting the DPI to 96 but I find it too small, so I increased it to 128. I saw a recommendation somewhere about using multiples of 96 but setting it to 192 was way too big so I preferred multiples of 32.
I also found a tutorial to change the scale of specific displays when using multiple monitors which I’ll probably revisit later.
SLiM
From the package description:
SLiM is a lightweight login manager based on GNUstep’s Login.app. It makes a great replacement for XDM for those who want something that looks good, but still do not want Gnome or KDE.
I boot directly to a graphical environment and use SLiM to start awesome WM
via my user’s $HOME/.xinitrc. For this, I set the default runlevel to 4 in
/etc/inittab.
I also create the following file:
% cat <<EOF > /etc/rc.d/rc.4.local
#!/bin/bash

# Start SLiM...
if [ -x /usr/bin/slim ]; then
  exec /usr/bin/slim
fi
EOF
% chmod +x /etc/rc.d/rc.4.local
And change the login_cmd line in /etc/slim.conf to run $HOME/.xinitrc:
% cat /etc/slim.conf
...
login_cmd           exec /bin/bash -login ~/.xinitrc %session
# login_cmd           exec /bin/bash -login /usr/share/slim/Xsession %session
...
Running per-user applications
To run applications after logging in, I run a few programs and then send them to the background via xinitrc by including this snippet:
# $HOME/.xinitrc
...
[ -f $HOME/.xinit_private ] && sh "$HOME/.xinit_private"
...
And in $HOME/.xinitrc_private I run some applets, e.g.:
# $HOME/.xinitrc_private

nm-applet & # XFCE4 NetworkManager applet loaded to system tray
File Manager
I’ve been using Thunar lately. At first I found it too bright compared to what I’m used to, so I duckduckgoed around and discovered you can configure it via lxappearance(1) and that there are a lot of themes from the community, I picked Dark Olympic as I find it compact and not so dark.
Thunar allows you to add custom actions to interact with files (e.g., extract
a zip archive) and I used to do just that, but now I simply install the
thunar-archive-plugin as they recommend:
% myslack install -y thunar-archive-pluginDefault Applications
I try to use xdg-open(1) which will try to open a file depending on it’s MIME
type, one can easily override system defaults by using a file in
$HOME/.local, e.g.:
$ mkdir -p ~/.local/share/applications
$ cat <<EOF > ~/.local/share/applications/defaults.list
application/pdf=okular.desktop
EOF
Just make sure you specify a .desktop file that exists in
/usr/share/applications!
ACPI
Hotkeys also do not work properly. Some keys work out of the box but others,
like the volume and screen brightness do not. These, of course, are system
(and hardware) dependent. I’ve configured my system to properly handle
brightness by using acpid(8), adding actions for each key and updating
/etc/acpi/acpi_handler.sh to handle the video/brightnessdown and
video/brightnessup events:
# /etc/acpi/acpi_handler.sh

case "$1" in
  ...
  video)
    case "$2" in
      brightnessdown) /etc/acpi/actions/FnF5-brightnessdown.sh
         ;;
      brightnessup) /etc/acpi/actions/FnF6-brightnessup.sh
         ;;
      *) logger "ACPI action $2 is not defined"
         ;;
  ...
esacSound
I run pulseaudio system-wide. I enable the pulseaudio service and have my
/etc/asound.conf look like the following:
% cat /etc/asound.conf
pcm.default pulse
ctl.default pulse

pcm.pulse {
	type pulse
}

ctl.pulse {
	type pulse
}
% chmod u+x /etc/rc.d/rc.pulseaudio
% /etc/rc.d/rc.pulseaudio start
polkit (PolicyKit) for privileged actions
PolicyKit is used to grant authorization to restricted actions via policies that can match user ID, group or other contextual variables. Per the package description:
PolicyKit is an application-level toolkit for defining and handling the policy that allows unprivileged processes to speak to privileged processes. PolicyKit is specifically targeting applications in rich desktop environments on multi-user UNIX-like operating systems.
NetworkManager
I use NetworkManager for easier handling when WiFi is disconnected: it’s
much simpler to click stuff than going to a root terminal and running
/etc/rc.d/.rc.inet1 restart.
I setup my X session (~/.xinitrc) to run nm-applet which is a tray applet
to interact with NM (NetworkManager). Normally you would get a permission
denied error when trying to disable an interface or (dis)connect to a wifi
network because NM is started by root and the X session is running as a
different user, so we need a special policy to grant our user authorization
for NM actions.
With the following policy we allow users in the netdev group to manage NM:
// /etc/polkit-1/rules.d/10-org.freedesktop.NetworkManager.rules

polkit.addRule(function(action, subject) {
  if (action.id.indexOf("org.freedesktop.NetworkManager.") == 0
    && subject.isInGroup("netdev")
  ) {
    return polkit.Result.YES;
  }
});
And with the following command my user (geckox) is added to the
netdev group:
% usermod -a -G netdev geckoxI assume this policy would also allow to control NM via the CLI command
(nmcli) and the terminal UI (nmtui).
Thanks to atelszewski for the LinuxQuestions post!
Suspension
Suspension is acomplished via elogind. For this to work, I added my user to the “power” group and added a polkit rule for power management:
% usermod -a -G power geckox

% cat /etc/polkit-1/rules.d/10-enable-session-power.rules
polkit.addRule(
  function(action, subject) {
    if (
      (action.id == "org.freedesktop.login1.reboot" ||
       action.id == "org.freedesktop.login1.power-off" ||
       ...
       action.id == "org.freedesktop.login1.suspend"
      )
      && subject.isInGroup("power")
    ) {
      return polkit.Result.YES;
    }
  }
)